Welcome to TeardropForum.com › Forums › Teardrop Builders’ Forum › Alternative way to attach camper to trailer
- This topic has 17 replies, 3 voices, and was last updated 2 years, 6 months ago by
madebymike60.
-
AuthorPosts
-
December 16, 2021 at 8:15 pm #4032
madebymike60
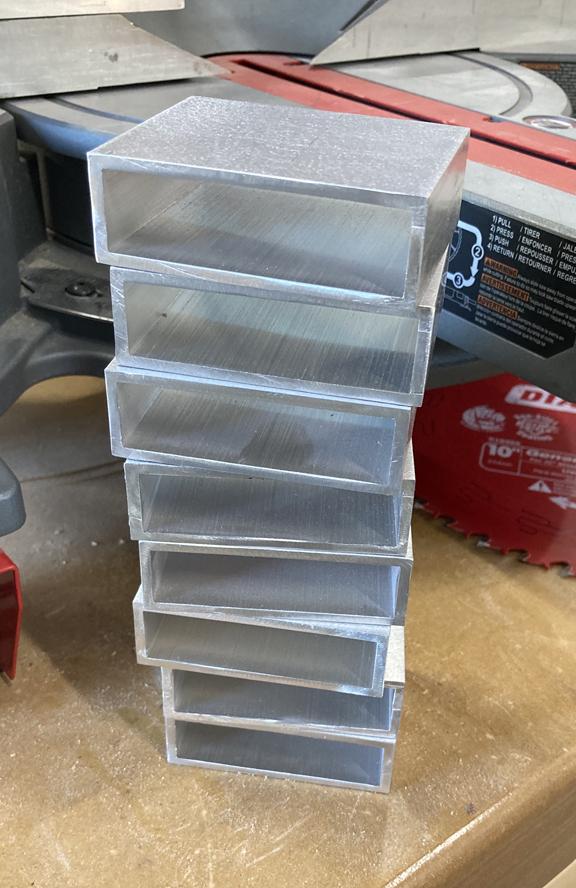
Participant1) I don’t like the idea of having holes in the bottom of the camper to attach it to the Trailex trailer (or for any other reason), plus that method seems like a lot of trouble, so here’s what I came up with instead. Starting with a length of 1″ x 3″ aluminum rectangular tubing, I cut pieces about 2.5 inches long to get 10 total. A metal-cutting blade for my miter saw made it go quickly but a hack saw would work. Here are most of them. Before cutting, I roughed one side of the tubing with 80 grit sandpaper to help the epoxy stick
.
 December 16, 2021 at 8:17 pm #4033Participant
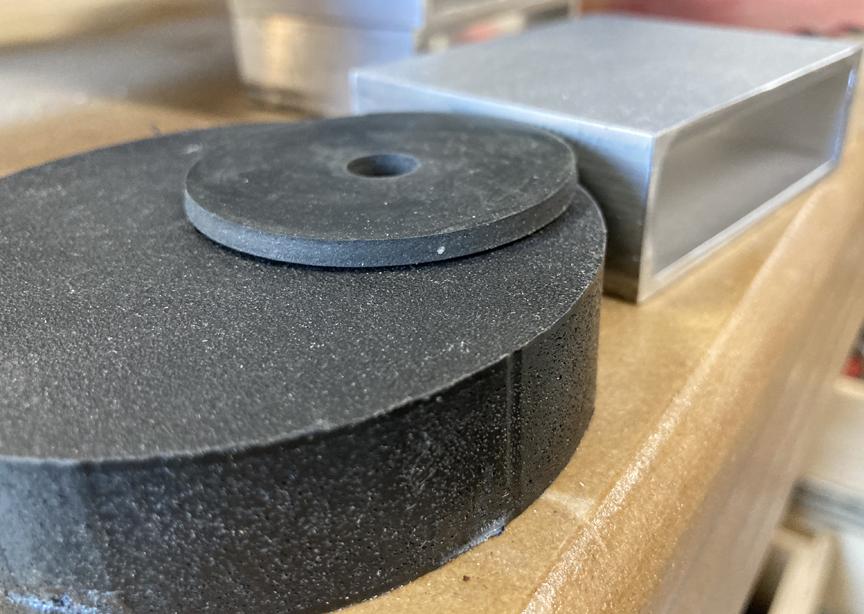
2) The one inch height is just over the combined height of the ‘hockey puck’ spacer and rubber washer that are shown in the directions so that size is about right. Two inches wide might work but three inches seems good because there’s more room for epoxy and plenty of room to get a wrench and fingers inside to help tighten the nut and bolt.
 December 16, 2021 at 8:18 pm #4034Participant
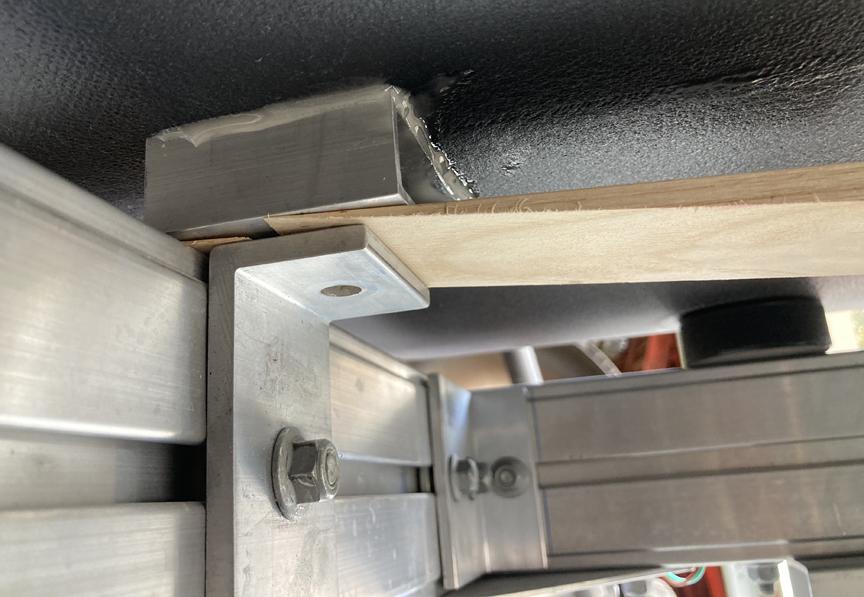
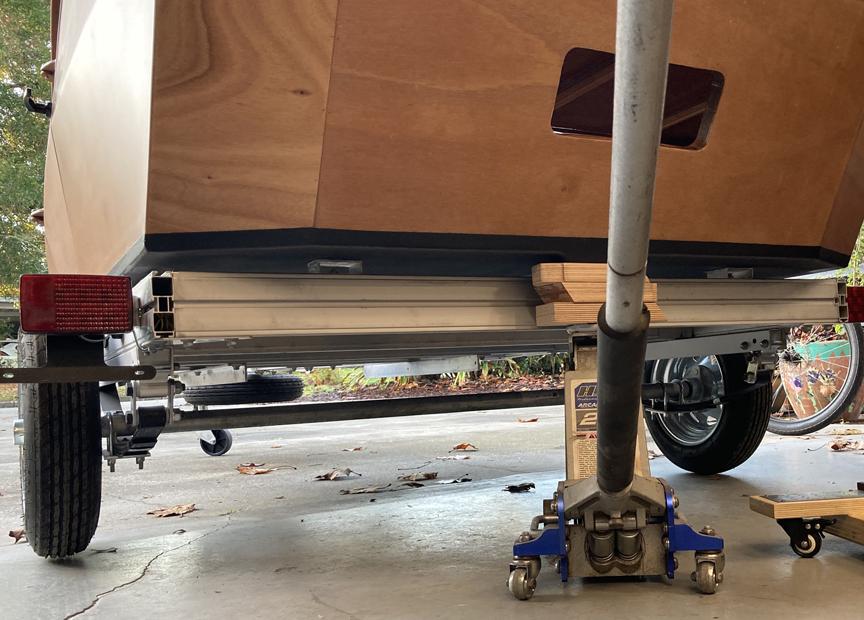
3) At this stage, you should have something holding your camper a little off the trailer – hockey pucks in my case. I used Loctite brand epoxy because it sets in about five minutes (though the kit epoxy would probably work just fine), and spread some on the sanded side of a piece of the tubing. Slide under your camper and insert the tubing between the camper bottom and one of the brackets attached to the trailer. Mine had just enough space for me to fit the tubing (and not have all the epoxy come off) because of the hockey pucks but you might have to prop or lift a section of the camper up slightly to make room. Also, if your camper bottom is shiny from (kit) epoxy, it should be sanded in that spot for the (aluminum) epoxy to stick better. I had coated the bottom of my camper with U-pol Raptor liner and their tech support said the epoxy should stick well to it. Here is one being wedged tight against the camper bottom until the epoxy sets. The hockey puck spacer is still in place on the right side.
-
This reply was modified 2 years, 7 months ago by
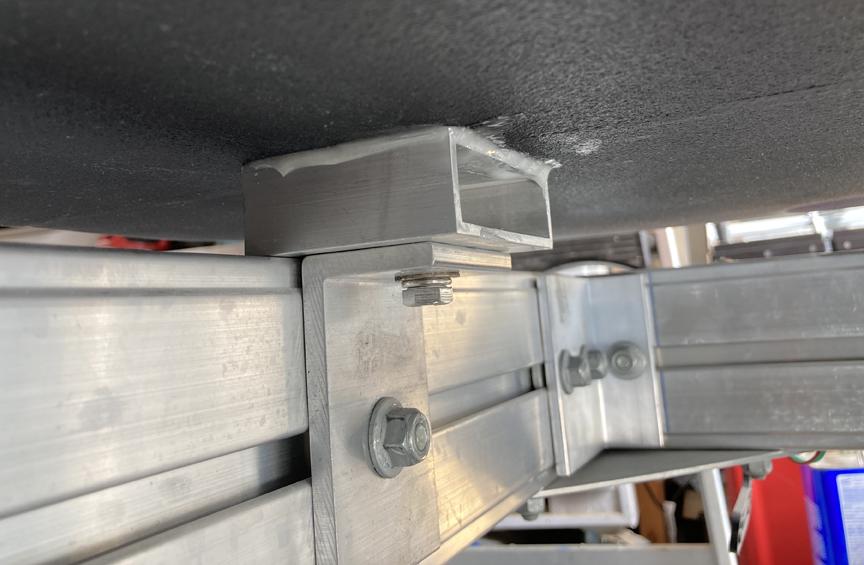
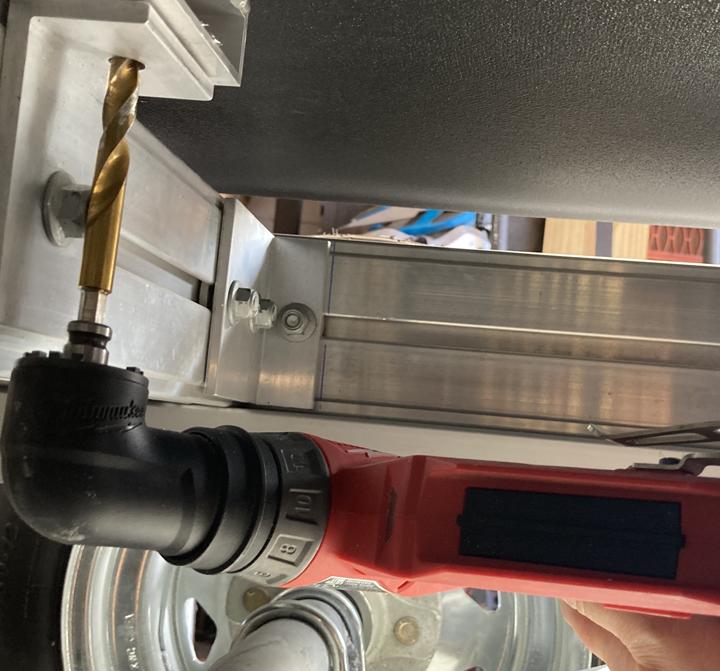
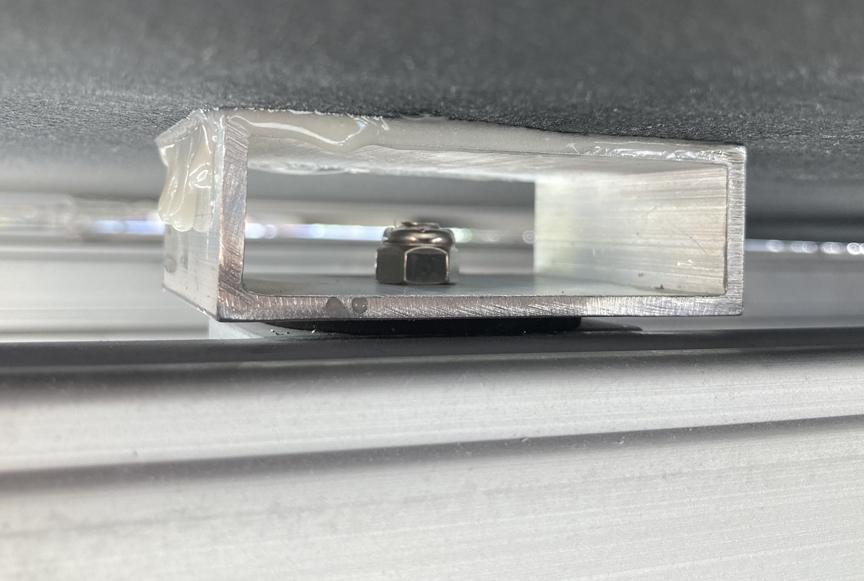
December 16, 2021 at 8:19 pm #4035Participant4) Once the epoxy has set, you’re ready to drill a 3/8″ hole through the bottom of the aluminum tubing and bolt it to the trailer. Once you get through the bottom of the tubing, stop drilling. I used stainless 5/16 – 18 x 1″ hex head bolts and the lock nuts that came with the trailer, plus flat and lock washers. Below is one installed and with the hockey puck spacer removed. Install one at each of the brackets and the camper should stay put. In testing a piece of aluminum epoxied to plain wood, I could not hammer them apart so I’m expecting these to stay together a long time. This picture doesn’t show it but I put a rubber dampener between the bracket and aluminum piece later. I’m not sure if they’re needed since in the camper directions they are used to ‘protect the camper bottom from wear’ and with this method, that shouldn’t happen.
-
This reply was modified 2 years, 7 months ago by
December 16, 2021 at 8:20 pm #4038Participant5) Here’s a little test I tried after about 12 hours of cure time. Only two pieces of the aluminum tubing are epoxied at the back and they are holding the trailer as it comes off the ground. It looks more impressive than it is since that’s only a small fraction of the force it would take to separate the tubing from the trailer (according to the epoxy data sheet).
 December 16, 2021 at 8:21 pm #4039Participant
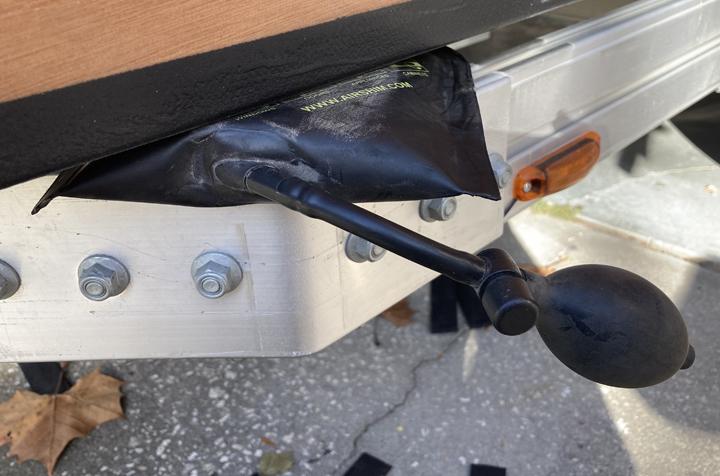
6) To attach the other eight pieces, I used an air shim to raise the camper so there was enough room to put the aluminum pieces in (with epoxy smeared on the top) and add woodworking shims to push them upward against the camper. I did two at a time because of the five minute set time of the epoxy. The air shims were used again later when inserting the rubber dampeners. They can be quite handy.
 December 16, 2021 at 8:22 pm #4040Participant
7) A right angle drill attachment will give you access to the brackets above the trailer axle.
 December 16, 2021 at 8:29 pm #4044Participant
8) Here’s one with the rubber washer in place. The one inch bolt is just long enough to work since the lock nut is on tight but 1 and 1/4 length would also work. Any longer than that and the bolt would probably hit the top of the aluminum tubing.
 December 16, 2021 at 8:30 pm #4045Participant
You do have to buy the aluminum and shorter bolts (together they were about $16) and maybe a bigger drill bit but benefits include:
1) You’re not putting holes in the bottom of the camper so there’s no chance of water intrusion there
2) You don’t have to remove the camper from the trailer and turn it upside down (to drill the holes)
3) There won’t be any bolt heads in the floor of your camper – I know a mattress would cover them but still…
4) It’s relatively easy to do everything – the hardest part is probably cutting the aluminum but there are ways to make it easier – metal cutting circular saw blade, jigsaw blade or grinder, for example – but if it’s all you’ve got, a hacksaw will work.
Finally, a mechanic’s creeper makes moving around under the trailer easier. Obviously, time will tell how well this method works but from a few simple tests, it seems like it will do the job.
December 17, 2021 at 12:40 am #4046jb
ParticipantWhile I understand your concern about not putting holes in the bottom of the camper, I think having 8-10 carriage bolts holding it all together is a much more comforting proposition. I think your setup probably won’t fail, but I’m 99.999% certain that the conventional approach of bolting it down won’t fail except in the most dire situations. And I can tell you from my experience, the 1/8″ protrusion of the carriage bolt heads can not be felt through a 4″ mattress. This has not been confirmed by the Princess nor the pea.
December 17, 2021 at 8:54 am #4051ParticipantI appreciate the feedback. I don’t think the conventional method will fail either. If it didn’t work well, there would be posts about it here and the only ones are about the difficulty of lining up the holes, etc. I also don’t think my method will fail and if I had the slightest notion that it might, I wouldn’t have done it on my camper and certainly wouldn’t have put the idea in the forum.
Bolt heads in the floor was a minor reason for thinking of a different method and only occurred to me after the fact. The two biggest reasons were the possible water issue and having to flip the camper twice at this point. I’m working alone and while I could get help to do the flips, I was trying to avoid it. Also, with the drill/fill method and plenty of sealant, it’s very unlikely water would be a problem at the holes. (My method has zero chance though.) It’s just that they are in a place that could go unnoticed for a while and I read several people sharing (on a tiny trailers forum) how the floor is about the worst place to have water damage.
Finally, I like to problem solve and try to come up with creative solutions when possible. No one should try my method without understanding that it hasn’t been ‘real world tested’. If a moderator of this forum feels like it is not a good alternative, they should remove the post(s) and I’ll understand. I’ve seen so many good ideas from other builders here and I simply thought I had one more…but maybe not.
December 23, 2021 at 12:00 am #4061breescyclust
ParticipantThis all looks and sounds great. Now. And I don’t want to rain on your parade. but I’d be uneasy about having rigid epoxy bonding aluminum with a high thermal expansion coefficient to wood (with hardly any) in an area I’m unlikely to monitor, especially when those joints will shock load a bit going down the road.
I understand the concerns about sealing the attachment bolts, and since I’m only about 30 hours into building mine, I have some time to think about all this…
Thanks for sharing!
Brian
January 11, 2022 at 3:45 pm #4112ParticipantWell, it seemed like a good idea and was worth a try but after a couple of short trips around town, one of the epoxy joints at the front of the trailer separated and that’s one too many. I think the bracket locations were all cleaned and prepped the same but maybe there was something different about that one. It doesn’t matter though, other joints may never separate or may not be too far behind but it’s not worth the risk. I can change to the method of drilling through the camper without having to flip it so I’m glad to find out now when it’s easy enough to redo.
So once again, do not try this method of attaching your camper or if you do, do so at the risk of seeing your camper in the distance in your rear view mirror.
jb and breescyclust, I do appreciate the feedback. I thought about some of the same things before trying the idea and it’s good to see others on this forum thoughtfully critiquing what’s being posted. (It seems like there should be a moderator doing that occasionally though.)
January 11, 2022 at 7:12 pm #4113ParticipantThanks for the followup on the alternative method, sorry it didn’t work out. Can you tell where it separated – between the Al and epoxy or between epoxy and paint or paint and the fiberglass underneath? For other projects where I tried to attach aluminum to something with epoxy I would usually score the aluminum maybe 1/32 inch with a hacksaw or sometimes drill though with multiple 1/8 inch holes (or similar) to give the epoxy more grip. Not suggesting you should try other methods but if someone else comes across this thread maybe they can figure a way to make it work.
January 11, 2022 at 10:49 pm #4115ParticipantYes, it was easy to tell. The separation was between the epoxy and the U-pol raptor coating which I put on the bottom of the camper. (By the way, that coating seems extremely tough and like it will never come off.) I vaguely remember not sanding one of the areas on the bottom of the camper but don’t know if it’s the one that failed. The epoxy was still stuck to the aluminum which I had sanded with 80 grit paper before installing. I could scrape the epoxy off the aluminum but it took effort and only came off in tiny pieces.
Now I’m thinking about redoing only some of the brackets the ‘proper’ way, enough so the camper stays put, and seeing if the few I leave with my method happen to hold. I’m curious to know just how good (or bad) an idea it actually was.
-
This reply was modified 2 years, 7 months ago by
-
AuthorPosts
- You must be logged in to reply to this topic.