Welcome to TeardropForum.com › Forums › Teardrop Builders’ Forum › Building the trailer without a galley › Reply To: Building the trailer without a galley
Here’s the plan after reading the builder’s manual last week. I avoid changes to the build procedure as much as possible. My kit ships on May 30th, and I’ll start on June 3rd at the earliest. I’ll decide definitely whether to make these changes when I reach Chapter 5. I hope to finish the shell, end of Chapter 6, by the end of June. July will be hot in Georgia. I’ll post pictures if and when I actually modify parts.
1. Before fitting the bulkhead and galley flat (Chapter 5), modify these parts as follows.
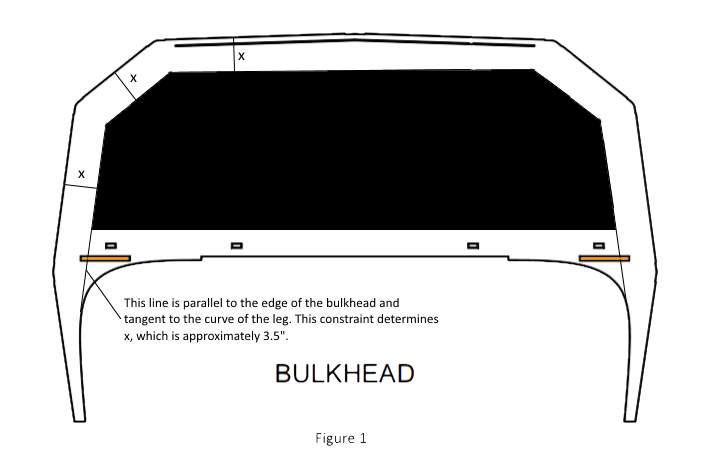
A. Cut a hole in the bulkhead as indicated in Figure 1, and mark the bulkhead with the indicated lines. Fill the slots for the galley flat with wood putty and sand after curing.
B. Cut from the galley flat the parts fitting the slots filled in the bulkhead.
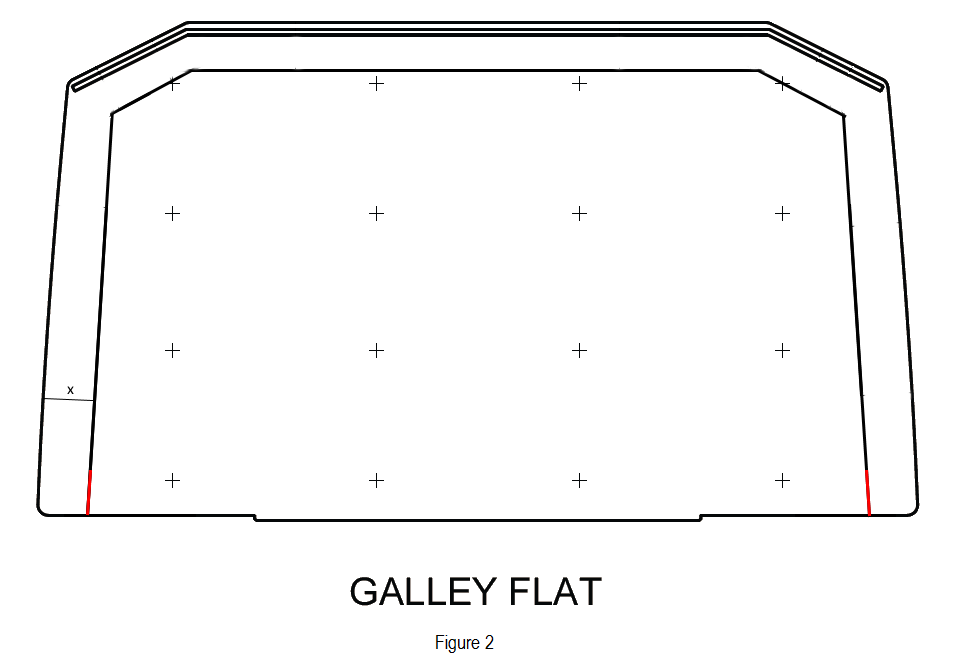
C. Mark the galley flat with the line indicated in Figure 2 and cut the portions of the line in red. Secure a thin piece of something into the cut to prevent pressure on the side of the flat closing it.
2. Modify instructions in Chapter 5 as follows.
A. On p. 87, omit the stiffeners.
B. On p. 92, apply no glue to the bulkhead slots. Wood putty fills the slots.
C. On p. 93, apply no glue to the mating edge of the bulkhead.
D. After dropping the flat in place on p. 93, drill holes and stitch the flat to the bulkhead along the mating edge.
E. On p. 94, apply the epoxy fillet between the flat and bulkhead only up to the red line cut in 1.C.
F. On p. 98, do not round the edges of the bulkhead and flat.
G. On p. 99, do not epoxy the surface of the flat within the line marked in 1.C.
3. After cutting the hatch, at the end of Chapter 7 or anytime thereafter, remove portions of the bulkhead and galley flat.
A. Remove the stitches applied in 2.D.
B. Supporting the galley flat from beneath, cut it along the line marked in 1.C. Remove the portion within the line.
C. Cut the bulkhead along the lines marked in 1.A. Remove the portion between the lines.
D. Sand and epoxy the cut edges.
4. The portion of the galley flat removed can be replaceable, restoring some horizontal rigidity.
A. Remove the portion of the flat fitting the mating edge of the bulkhead.
B. Shorten the stiffeners and glue them to the removable flat.
C. Sand and epoxy the removable flat.
D. Attach lift off hinges to one side of the top of the removable flat and flat border and a latch to the other side.
E. Since the bulkhead does not support the flat, attach an adjustable table leg to the center of the bottom.
What can go wrong?
Removing so much of the bulkhead and galley flat reduces the rigidity of the shell. The walls could buckle, particularly with load on the roof. Installing the removable flat addresses this concern, but if the walls buckle much with the flat removed, the latch may not close.
Solution: Attach a kevlar line with a turnbuckle between the bulkhead borders just above the flat. The line adds horizontal rigidity, and the turnbuckle can correct for a little buckling when installing the flat. With the flat installed, the line is also a fiddle. Without the flat installed, it’s a clothesline or something, and it’s easily removed. With no load on the roof, the support seems unnecessary. A second line further up the bulkhead adds more rigidity and is better positioned for hanging things.