Welcome to TeardropForum.com › Forums › Teardrop Builders’ Forum › Building the trailer without a galley
- This topic has 27 replies, 8 voices, and was last updated 6 years, 9 months ago by
Bob D..
-
AuthorPosts
-
May 16, 2017 at 3:18 pm #834
restonthewind
ParticipantWithout the galley bulkhead and flat, raising the galley hatch creates a lot of interior space in the rear of the camper, and soft walls (tent fabric) enclose this space. In warm weather, opening the hatch creates a large, well-ventilated space. In cold weather, closing the hatch creates a smaller, well-insulated space requiring less energy to heat. With the soft walls removed and the removable flat in place, the hatch still works as designed.
May 25, 2017 at 1:57 pm #843ParticipantHere’s the plan after reading the builder’s manual last week. I avoid changes to the build procedure as much as possible. My kit ships on May 30th, and I’ll start on June 3rd at the earliest. I’ll decide definitely whether to make these changes when I reach Chapter 5. I hope to finish the shell, end of Chapter 6, by the end of June. July will be hot in Georgia. I’ll post pictures if and when I actually modify parts.
1. Before fitting the bulkhead and galley flat (Chapter 5), modify these parts as follows.
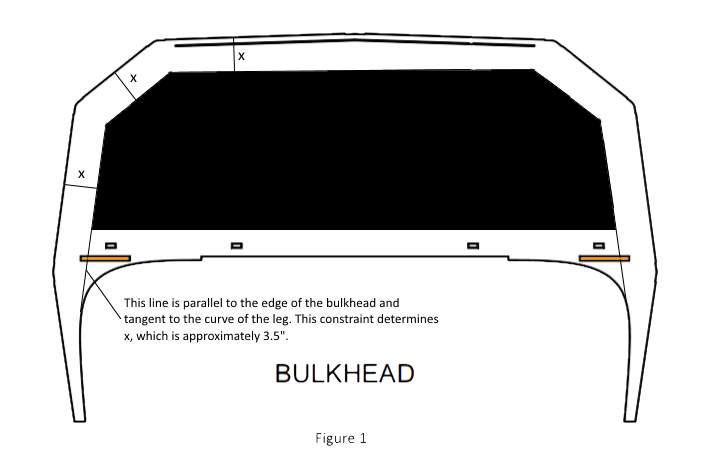
A. Cut a hole in the bulkhead as indicated in Figure 1, and mark the bulkhead with the indicated lines. Fill the slots for the galley flat with wood putty and sand after curing.
B. Cut from the galley flat the parts fitting the slots filled in the bulkhead.
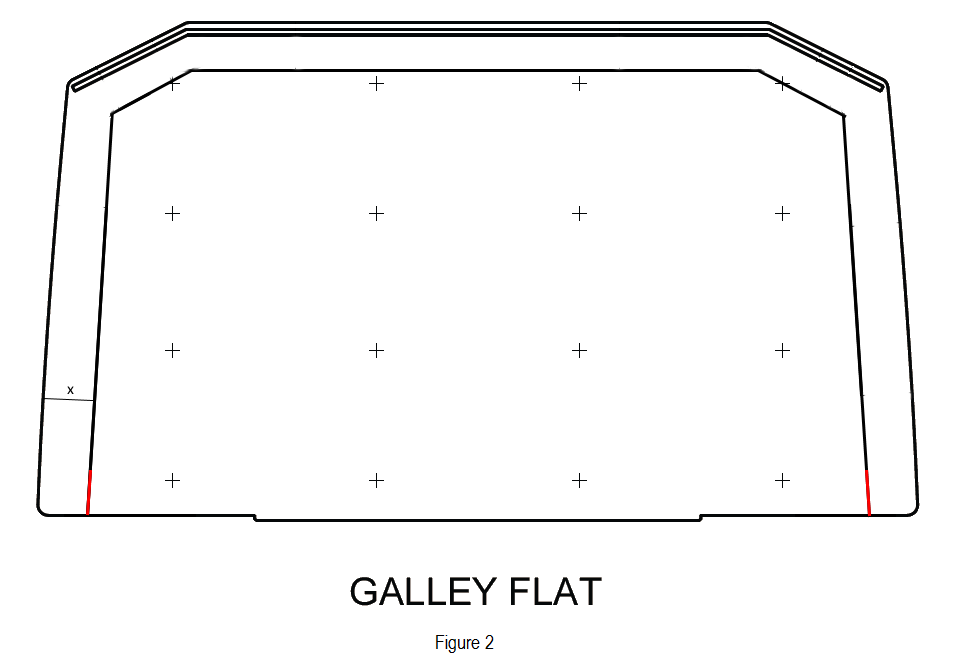
C. Mark the galley flat with the line indicated in Figure 2 and cut the portions of the line in red. Secure a thin piece of something into the cut to prevent pressure on the side of the flat closing it.
2. Modify instructions in Chapter 5 as follows.
A. On p. 87, omit the stiffeners.
B. On p. 92, apply no glue to the bulkhead slots. Wood putty fills the slots.
C. On p. 93, apply no glue to the mating edge of the bulkhead.
D. After dropping the flat in place on p. 93, drill holes and stitch the flat to the bulkhead along the mating edge.
E. On p. 94, apply the epoxy fillet between the flat and bulkhead only up to the red line cut in 1.C.
F. On p. 98, do not round the edges of the bulkhead and flat.
G. On p. 99, do not epoxy the surface of the flat within the line marked in 1.C.
3. After cutting the hatch, at the end of Chapter 7 or anytime thereafter, remove portions of the bulkhead and galley flat.
A. Remove the stitches applied in 2.D.
B. Supporting the galley flat from beneath, cut it along the line marked in 1.C. Remove the portion within the line.
C. Cut the bulkhead along the lines marked in 1.A. Remove the portion between the lines.
D. Sand and epoxy the cut edges.
4. The portion of the galley flat removed can be replaceable, restoring some horizontal rigidity.
A. Remove the portion of the flat fitting the mating edge of the bulkhead.
B. Shorten the stiffeners and glue them to the removable flat.
C. Sand and epoxy the removable flat.
D. Attach lift off hinges to one side of the top of the removable flat and flat border and a latch to the other side.
E. Since the bulkhead does not support the flat, attach an adjustable table leg to the center of the bottom.
What can go wrong?
Removing so much of the bulkhead and galley flat reduces the rigidity of the shell. The walls could buckle, particularly with load on the roof. Installing the removable flat addresses this concern, but if the walls buckle much with the flat removed, the latch may not close.
Solution: Attach a kevlar line with a turnbuckle between the bulkhead borders just above the flat. The line adds horizontal rigidity, and the turnbuckle can correct for a little buckling when installing the flat. With the flat installed, the line is also a fiddle. Without the flat installed, it’s a clothesline or something, and it’s easily removed. With no load on the roof, the support seems unnecessary. A second line further up the bulkhead adds more rigidity and is better positioned for hanging things.
May 25, 2017 at 3:47 pm #845JakeM
ParticipantI’m looking forward to seeing the photos! Seems like an interesting idea.
May 26, 2017 at 3:42 pm #849Bob D.
ParticipantI deviate from the manual all the time. Mostly it’s to streamline the build. The biggest example is I had the roof box installed and fiberglassed in (from the outside) before ever applying the 2nd epoxy fill coat. I did the fill coat on the roof box while sanding the first fill coat smooth. Did that a week ago, and only just last night cut out the galley hatch. Next up, door windows. Not the doors. I’m doing that so I can install the stiffeners and window sill (forget the official name) before cutting the door out in the hopes that everything fits later. I think one of the big problems with the doors is due to how many clamps people are using. If you squeeze the door to another part that doesn’t exactly match it, two things happen. The parts change shape, and you squeeze out all the adhesive. You’d never do that in a woodshop, so why do it when building a camper?
-Bob
May 27, 2017 at 12:20 pm #850ParticipantThe doors and hatch seem the most error prone, and people have posted about ill-fitting doors, so let us know how your approach works. Installing the sill and stiffener through the window before cutting the door seems tricky too.
May 28, 2017 at 3:24 am #851ParticipantSo at the risk of being the jerk that hijacks threads…. here goes (and I’ll do better in the future).
I’m wrong about clamping force squeezing out too much glue. I read up on it last night and there is no way these spring clamps can squeeze so hard that it would weaken the joint in any significant way -IF THIS WERE WOOD GLUE. Here’s some useful info with experimental data and such: http://woodgears.ca/joint_strength/glue_methods.html
I don’t know how epoxy behaves in a test like this so I retract my above comment. I did end up using spring clamps a plenty for my window sill install because, no surprise, the side of the camper isn’t at all flat but the sill is flat. Clamping these parts together absolutely did change the shape of the door and whole side. Bummer.
The manual says something about buying a bunch of extra 1/16″ drill bits cuz we’ll break them. I didn’t break any so I’m using them as alignment dowel pins for the window sill, and later the door stiffener.
Here’s where I am right now:
 May 29, 2017 at 5:03 pm #852Participant
Feel free to hijack. How are you inside of the shell at this point? Have you not installed the floor?
May 30, 2017 at 2:04 am #853ParticipantThe transom isn’t installed yet.
June 6, 2017 at 11:20 am #863ParticipantMy kit arrives today, so I’ve cleared out my garage and am taking inventory. The builder’s manual claims to use “inexpensive 2-inch spring clamps throughout”. I have 60 of these clamps, but your clamps appear longer than two inches, and clamps on the door in the manual appear longer. I won’t need them for a while, but I wonder. Will the two inch clamps really suffice?
June 28, 2017 at 6:31 pm #951Boardwalk
Participant2″ inch clamps are fine. (I was one of the students at the class)
We also used a few wood handscrew clamps and some c-clamps where we thought we needed a little more pressure.
June 29, 2017 at 8:15 am #952ParticipantThanks, Boardwalk. Nice to hear from someone in the class. I followed the shop cam, but it wasn’t streaming properly during the second week. In the final group shot, outside of the CLC building, you were at various stages of completion. Some people had a more complete finish while others had doors fitted. Several people in this forum report problems with fitting doors. Cutting the doors and hatch seems particularly perilous. What did you learn about fitting the doors?
I needed to replace a part, and my day job has me away from home for a few weeks, so my build is delayed, but I’ll be working on the camper again soon.
June 29, 2017 at 11:43 am #954faithie999
Participanthere’s a semi-hijack.
I read another thread some time ago about a suggestion to glue the stiffener on before cutting out the doors. yes, lots of in-and-out thru the transom while getting the chamfer on the stiffener just right. then I contemplated how to fasten the stiffener to the door while the epoxy cured.
I cut two pieces of scrap, about 2″ wide, long enough to span the length of the stiffener. I drilled 2 1/16 inch holes in either end, located so the holes would line up with the CNC cutouts for the door cut lines. then using cleats on the outside, I used some steel 18 ga wire (thinking it would pull up tighter than copper would due to the strength of steel). from the inside of the camper, I threaded the wire thru the two holes in each end of each stiffener, poked them through the CNC slots, then got out and threaded the protruding wire thru 2 holes in each cleats, and twisted it tight. it cinched tightly enough to squeeze the extra epoxy out of the joint as it should. I have since cut the doors out, have installed the window sills, but haven’t yet fit the doors. hopefully the doors have held the proper angle shape after cutting. we’ll see!
June 29, 2017 at 10:17 pm #956ParticipantI just drilled a 3rd hole in the stiffener and used 3 1/16″ drill bits as alignment pins. I then leaned a weight against it to keep it pressed to the door before I ever cut it out.
-
AuthorPosts
- You must be logged in to reply to this topic.