Welcome to TeardropForum.com › Forums › Teardrop Builders’ Forum › Roof rack from trailer bunks
- This topic has 8 replies, 1 voice, and was last updated 2 years, 6 months ago by
madebymike60.
-
AuthorPosts
-
November 12, 2021 at 11:32 pm #4005
madebymike60
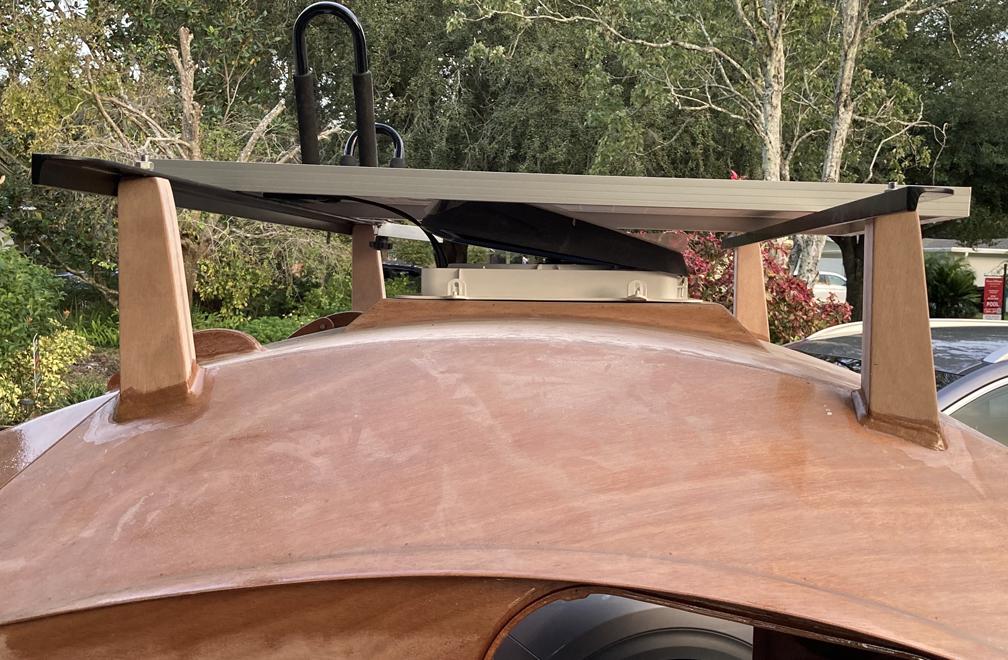
Participant1) If you don’t use the trailer bunks for a different trailer and don’t want to spend $500 on the CLC/Thule roof rack, you can use the bunks to make a nice, strong one – roof rack, that is. Here is mine about 90% done. I am trying to decide whether to finish it natural with epoxy or paint it black. Anyway, it’s not necessarily easy but it turned out well and was worth the time involved. It would be very helpful to have a compound miter saw plus you’ll need something for the cross member. I ripped (cut lengthwise) a long piece of aluminum that worked well. It’s painted black in the picture below. The rack has room for a solar panel in the middle and enough on the sides for kayak J-racks. One ‘J’ is on the far side of the rear crosspiece but there’s room for three more. New topics will follow this one and share how I did much of it but first, some things to keep in mind.
- It is worth spending a lot of time planning and test fitting.
- Your camper/trailer should be as level as you can make it before starting (or see the last item below).
- Have a plan (and materials) for supporting the wood upright pieces in place before mixing your epoxy.
- I intentionally made the front cross piece sit a little lower than the back one to prevent wind trying to lift the panel off the rack. I did this with the trailer level from front to back as best I could tell but if I had really thought through it, I might have put the trailer on my truck hitch to see how ‘out of level’ the trailer is when towed. As it is, the front rack is a little more than an inch lower and I think that will be fine.
 November 12, 2021 at 11:48 pm #4006Participant
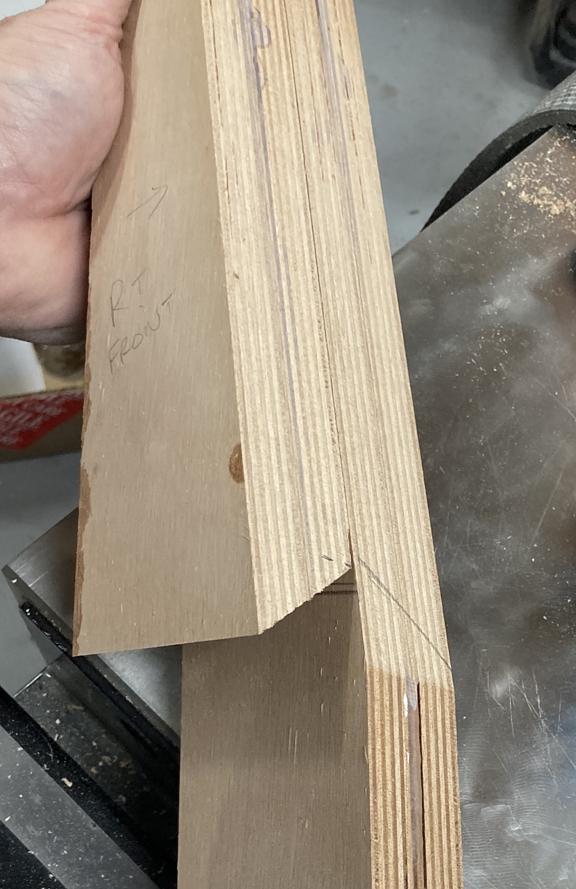
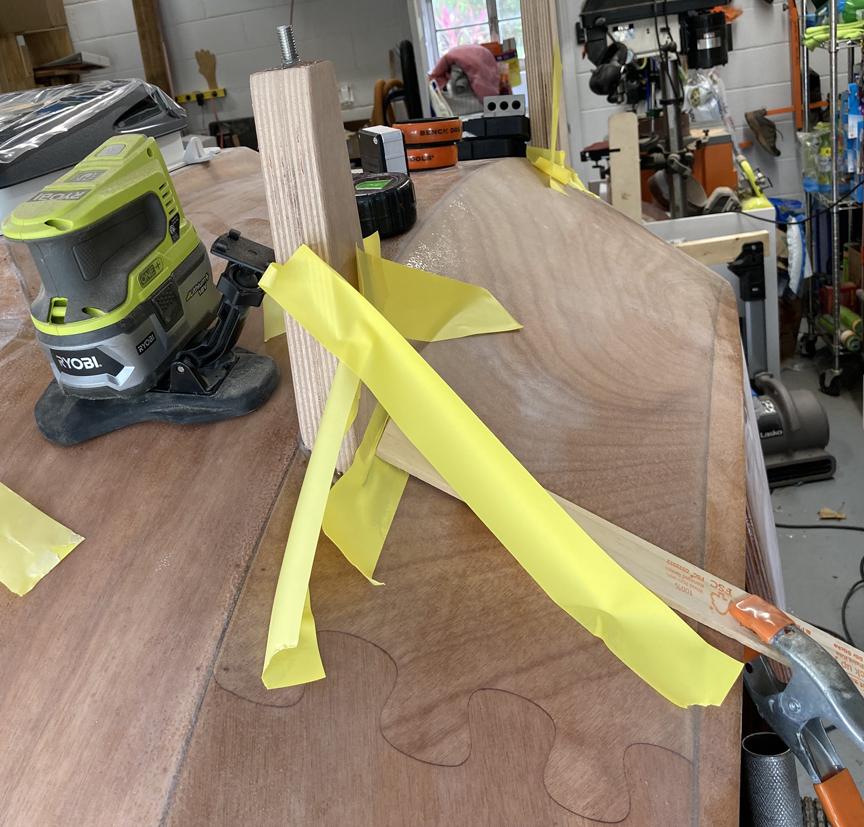
2) I used the ends of the bunks because I like the tapered look. I faced the taper/angle of each upright toward the front of the camper. You could also cut pieces from the middle of the bunks and not have an angle. (I actually tried that first but didn’t like it as much.) About 13-14 inches of the ends of the bunks were cut off and two pieces were epoxied together using cell-o-fil to end up with four upright supports. Two are in the picture below. The bottom of each is a compound angle cut. For mine, one angle was about 37 degrees and the other was about 12 degrees but yours may be different depending on your build and where you decide to put the supports. One support in the picture has the compound cut already and I’m using it to mark the other piece. Notice the piece is marked with its location on the camper (right, front) and and arrow to remind me which way faces forward.
 November 12, 2021 at 11:56 pm #4007Participant
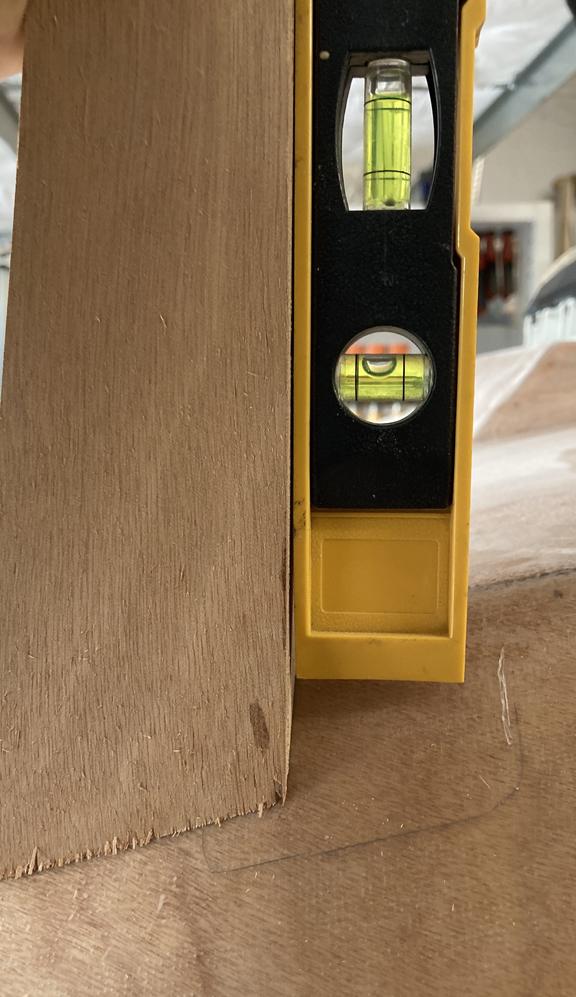
I spent a lot of time making each support fit at its location on the camper. A torpedo level was used to plumb the back (non-tapered) side of the supports. I then outlined on the camper where the base should go. (The pencil outline in the picture is from the first ones I tried but ended up not using.)
 November 13, 2021 at 12:04 am #4008Participant
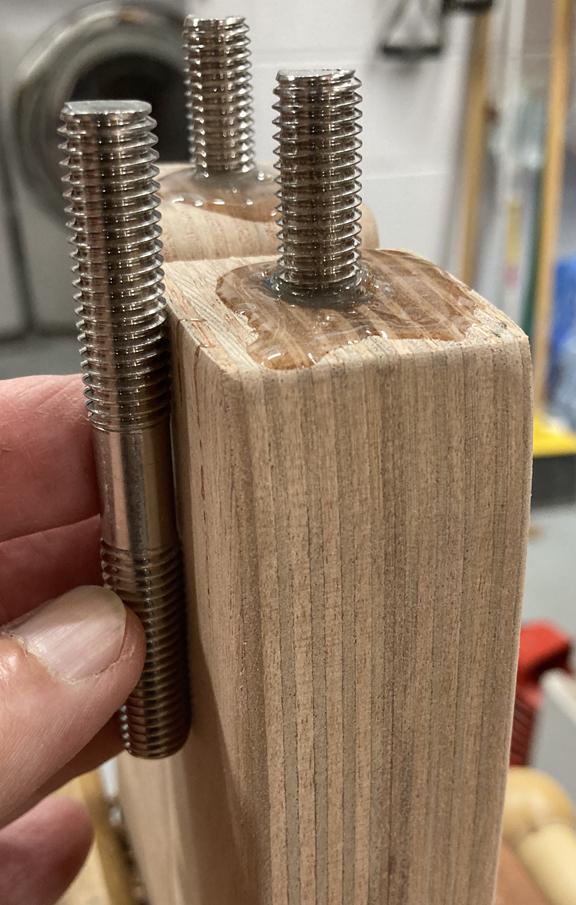
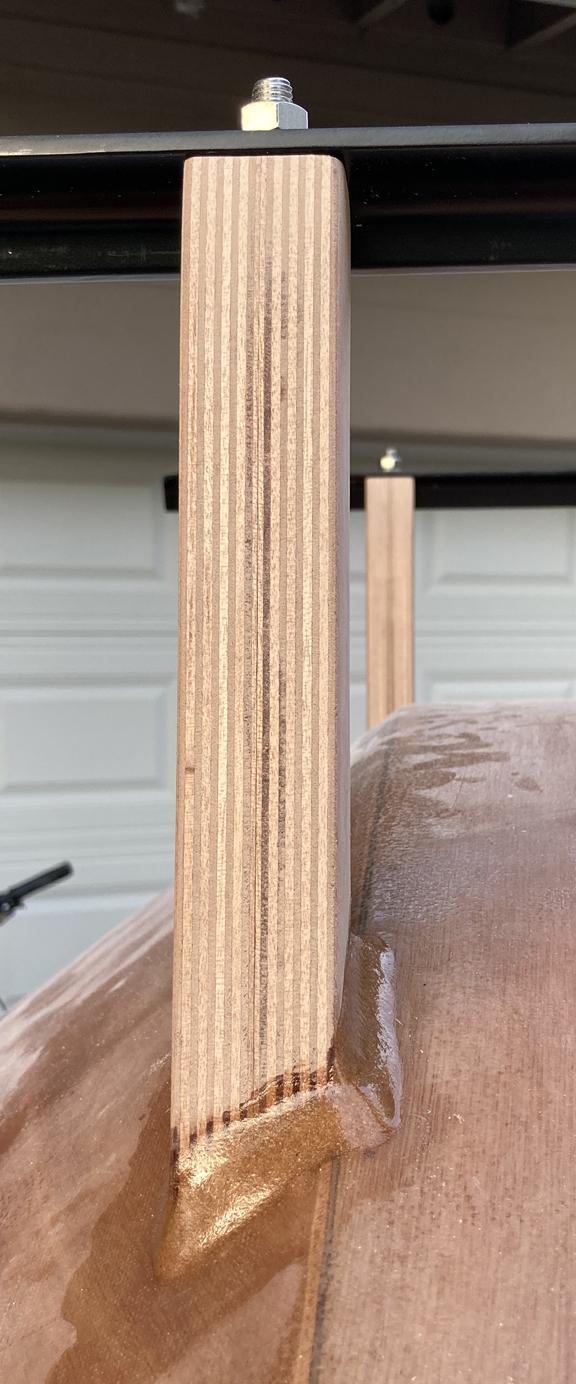
4) When the supports are ‘dry-fit’ pretty well (there may be a tiny wobble because you’re fitting a flat surface against one with a slight curve), I epoxied some stainless studs into the supports. This picture gives an idea of how much is in the wood. I just clamped the support piece and drilled a slightly oversized hole as straight up and down as I could.
-
This reply was modified 2 years, 8 months ago by
November 13, 2021 at 12:19 am #4010Participant5) You’ll have to be creative to hold the supports in place while the epoxy cures. The near one is held by a clamped paint stick, lots of tape and and car phone holder (with extra weight on it). I worked when it was about 78 degrees – not too warm but close – and I could only do two supports before the epoxy in the cup got too hot. It took a while to check plumb, adjust, tape and then repeat several times for each one. I realized too late that dry fitting was easier because the uprights stay in place better with just a little tape. They tend to slide on the epoxy, something I hadn’t thought of and they needed many more things keeping them in place.
 November 13, 2021 at 12:37 am #4011Participant
6) I mixed cell-o-fil with epoxy to attach the bottom of the supports to the camper. After about 40 minutes I scraped the extra away and a couple of hours later added the fillets you see below. My supports are approximately where the Thule ones would be but basically the rear ones are about as far back as possible (close to the galley hatch) and the front ones ended up 30 inches away (straight line measure). This picture shows how the front and rear supports should ‘align’ with each other when looking at both. This is important to do before the epoxy cures. If both are plumb, they will align but eyeballing it is a quick way to tell if one might be a little off.
After the epoxy cured, holes were drilled in the aluminum cross pieces to match the distance between the stainless studs. I measured, drilled one hole, placed the cross piece over that one bolt and marked where the other hole should be.
 November 13, 2021 at 12:51 am #4012Participant
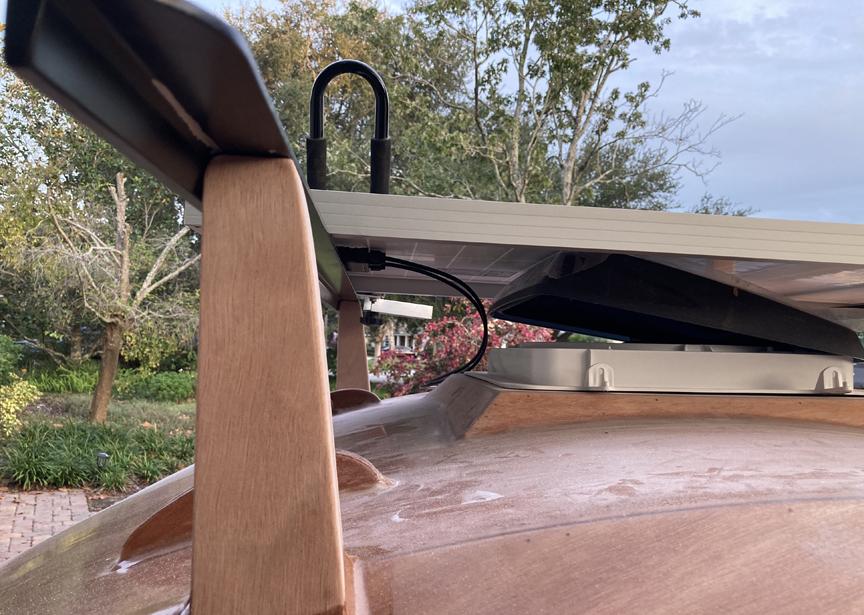
7) Here’s another look at the (nearly) finished rack. It seems very strong and just needs some epoxy or paint to protect the wood. There’s about an inch of clearance between the top of the rack and the fan cover but it can open a couple of inches with the solar panel in place because the panel has a recess under it (mine does anyway). It did take quite a few hours to figure out and make but I’m retired and have the time. The aluminum cost about $28 and the bolts were only $5 from Amazon so it was very reasonable as far as cost.
 November 13, 2021 at 1:04 am #4013Participant
8) Here’s a final view. The cross piece is an ‘L’ shape and pretty beefy – anywhere from 1/8 to just over 3/8 inches thick. The top of the wood support was rounded and tapered a little to fit nicely. The fan cover can open a little so even with the solar panel in place, the fan can still be used. Overall, I’m very pleased with how the rack looks and it seems like it will work very well.
 December 29, 2021 at 11:39 pm #4077Participant
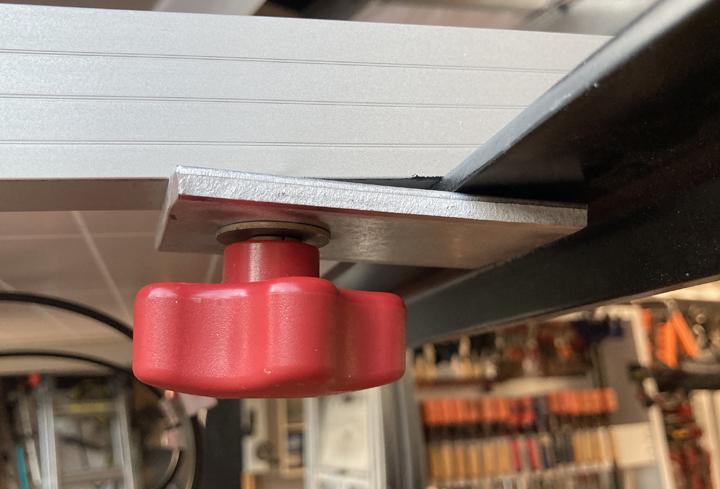
Here’s how the solar panel will likely clamp to the rack. It’s just a thick piece of aluminum (2″ by about 2.5″) with a hole drilled toward one end. I had the aluminum and hardware (knobs, bolts and washers) already so it was pretty much no cost and holds very tightly. Two of the pre-drilled holes in the solar panel frame worked but I had to drill two more to match the distance between the rack cross pieces.
-
AuthorPosts
- You must be logged in to reply to this topic.