Welcome to TeardropForum.com › Forums › Teardrop Builders’ Forum › Internal locking, gas strut locking, battery box
- This topic has 7 replies, 5 voices, and was last updated 4 years, 5 months ago by
caveprod.
-
AuthorPosts
-
October 15, 2018 at 6:11 am #2196
caveprod
Participantand maybe other sundries.
1 I noticed after I added my gas struts that they didnt really keep the galley hatch “up”. it would sag down, or get blown down by wind and I came close to wacking my head with it. Maybe my gas struts werent up to it for some reason, by my solution was to get some 1/2″ (9/16″? or similar) conduit, slot it with approximately a 1/4″ slot using my circular saw, cut it to the right length, attach some tape to detach it at will and now my hatch stays totally up until I want it down. The conduit doesnt move until I grab it off either.

Strut stays up. I have two, to be sure, to be sure.
2 My wife said we needed an internal lock on the camper, since no one else seemed to have got any suggestions that I could see, I just attached some of my spare nylon webbing left over from the door, looped a bit, and pop riveted a couple of washers to keep the loop then screwed the assembly to the shelf. we just loop the webbing around the door handle and it stays locked. I can’t see anyone being able to open the door now when we are inside.
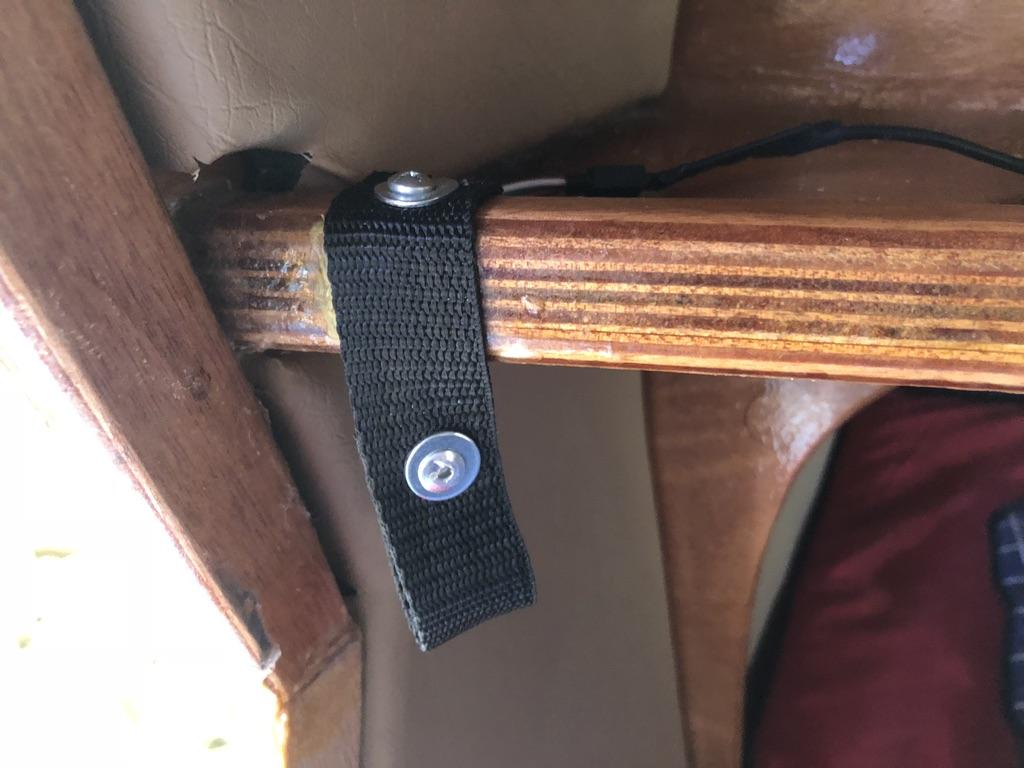
unlocked

locked
3 I was concerned my 100AH lead crystal battery would go straight through the floor of the galley while I was building the electrical system, its scarily heavy and there are bumps in the road. So my friends bent up an aluminium box for the battery that was glued and screwed to the bulkhead and the floor, along with some extra fibreglass tape. I think the weight is on the bulkhead now, not so much on the floor and there is where it will stay. I had 12 screws holding the box to the bulkhead. (Notice the tie down to make sure the battery doesnt bounce.)

(and oh please ignore the temp wiring while my shelving/fusing is removed, for this shot.
4 Last point. I put vinyl on the insulation. seemed to work ok, looks smart.

5 I watched a lot of waterlusts construction videos on youtube, enjoyed them, didnt agree with everything though. They suggested dropping the front vents to keep rain water out. They work so well when the ventilation fan is running that I couldnt live without them (even if you do need to be careful not to let them leak (or drop off.)
October 15, 2018 at 7:43 am #2197smithn00
ParticipantCould you explain how you put vinyl on the insulation? Do you mean the grey/black foam that is offered by CLC?
October 15, 2018 at 4:46 pm #2198ParticipantYes, i bought the foam kit from clc, routed the edges (which was a lot easier than I expected) and bought 6 metres (7 yards?) of (different coloured) vinyl. I also ended up buying 6 litres of selleys contact glue. http://www.selleys.com.au/trade/specialist-products/contact-adhesive/
there’s nothing special about selleys, it’s just an example.
Mark the outline of the foam on the vinyl with a texta, leave an inch and a half spare for folding up and over. roll a thin layer of glue on vinyl and the foam, wait 20 mins and then press them together. Get it right as they wont let go.
just note which is the front and which is the back of the foam before you route and glue, not all the foam is symetrical.
they didnt think the foam was durable at the waterlust youtube, hopefully this is better, hopefully it never condenses water on me in humid weather either.
October 23, 2018 at 10:15 am #2232ArtisticAdam
ParticipantI love the locking mechanism you came up with for the gas springs. Thanks for sharing. I’m swapping mine out for 30# versions but will likely incorporate your mechanism as well.
August 8, 2019 at 9:05 pm #2694PopeyeTheTrailerMan
ParticipantHere’s a variation on your internal lock idea. I liked the simplicity of your concept, but it seemed to me that the mechanics could be improved a bit. The main thing was to attach the straps to the door frame, rather than the shelf. This improves the mechanical advantage and pretty much guarantees that the loop will never accidentally slip off. The other thing was to use a stitched loop to avoid having a loose piece of metal flailing around.
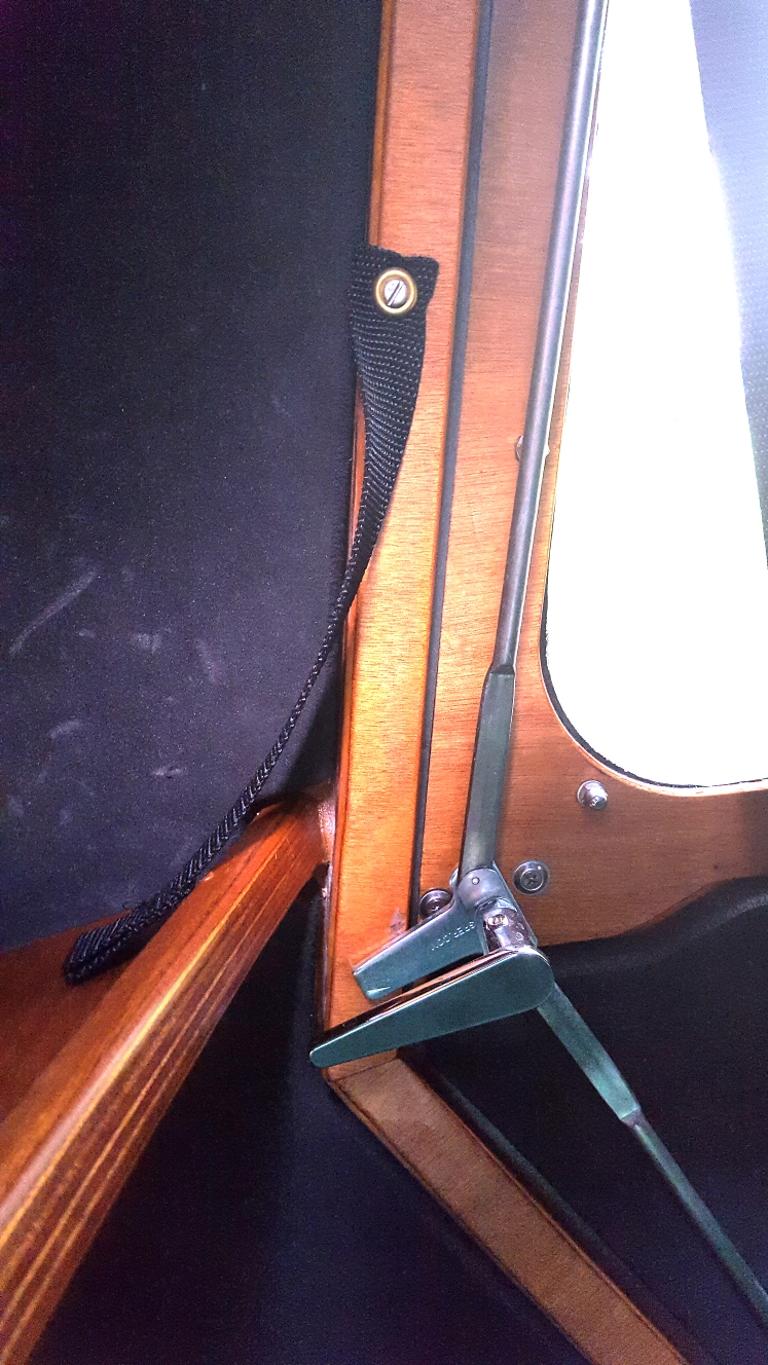
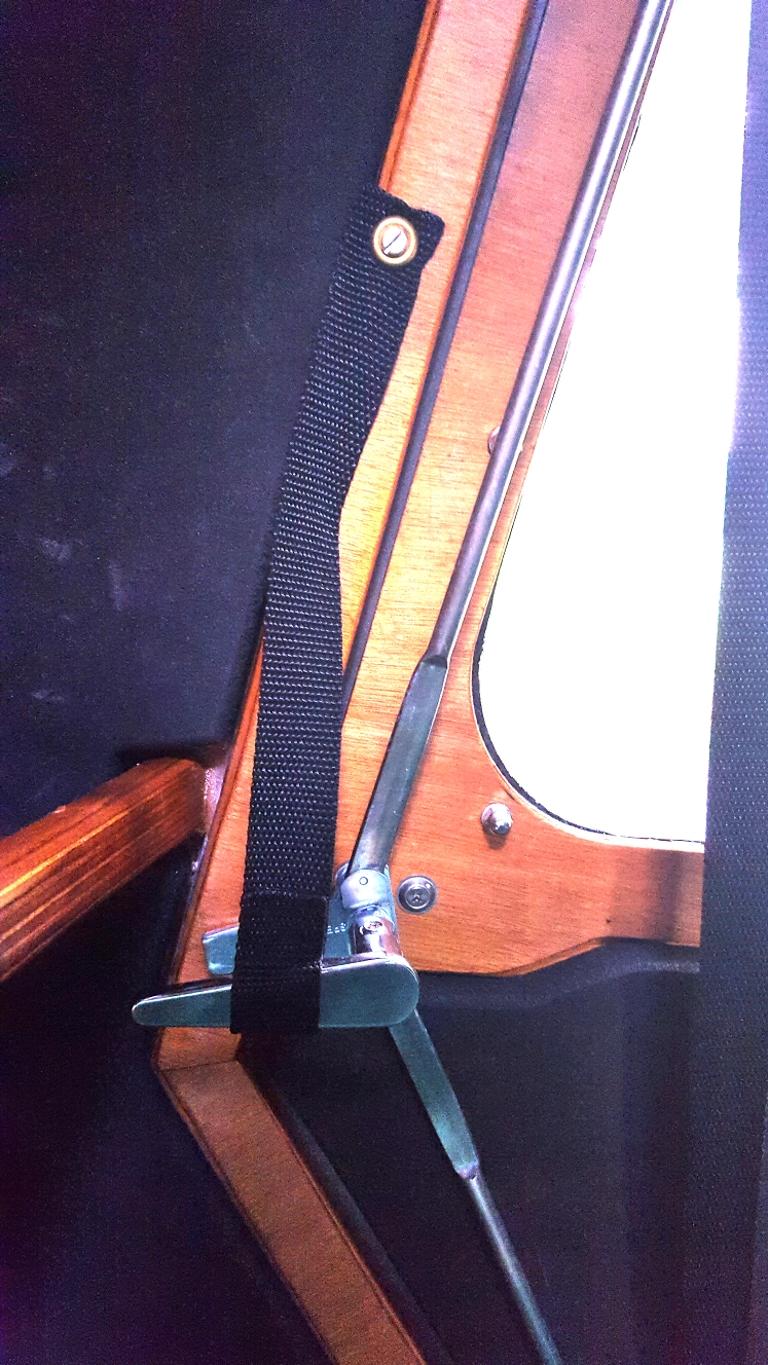
I did have to be careful when attaching the strap to make sure that the screw was in the thick part of the door frame, instead of the sill.

Thanks for the idea.
August 13, 2019 at 6:15 pm #2695faithie999
ParticipantI replaced one of the stock gas springs with a 30# version. it holds the hatch in the open position just fine. but remember the Ideal Gas Law from high school chemistry–when it gets cold the force exerted by the gas is lower, so if you will use the camper in the winter you might want to replace both springs with 30# versions.
ken
February 10, 2020 at 5:06 am #2885ParticipantMy gas struts have always been too wimpy for the job, summer or winter, so beefier rates on them sound very advisable. Mind you, I would still use the stays in case a wind smacks the top down on you anyway. My stays do the job perfectly either way.
Everything else seems to work well over a year later. I get a little water in through the galley hatch some times, I’m still in seek-and-destroy mode for that one, its in the right back corner somewhere. It rains so rarely where I live that I dont get to recheck very often.
Which brings me to another pet peeve point perhaps. Some people have said drop the front vents because water seeps in. I havent had that problem, perhaps because I havent driven through too much rain, but I do love the front vents because when its hot, I can feel quite a breeze flowing past my face just from convection when the top vent is open. Put the fan on and you can be in a draft. It occurs to me it wouldnt be too hard to cut a seal out of a foam sheet using large circular hole drills to make them more reliable.
My wife doesnt like the top fan on because of the noise but she does suffer from claustrophobia. So maybe we crack the doors open sometimes.
Like other people I have lost a mushroom vent cap at some stage, in this case after I was showing someone the camper and didnt close it down properly afterwards. I do have a 3D printer and “freeCAD” software so after not finding a design to print from the web, made one myself (see image below)
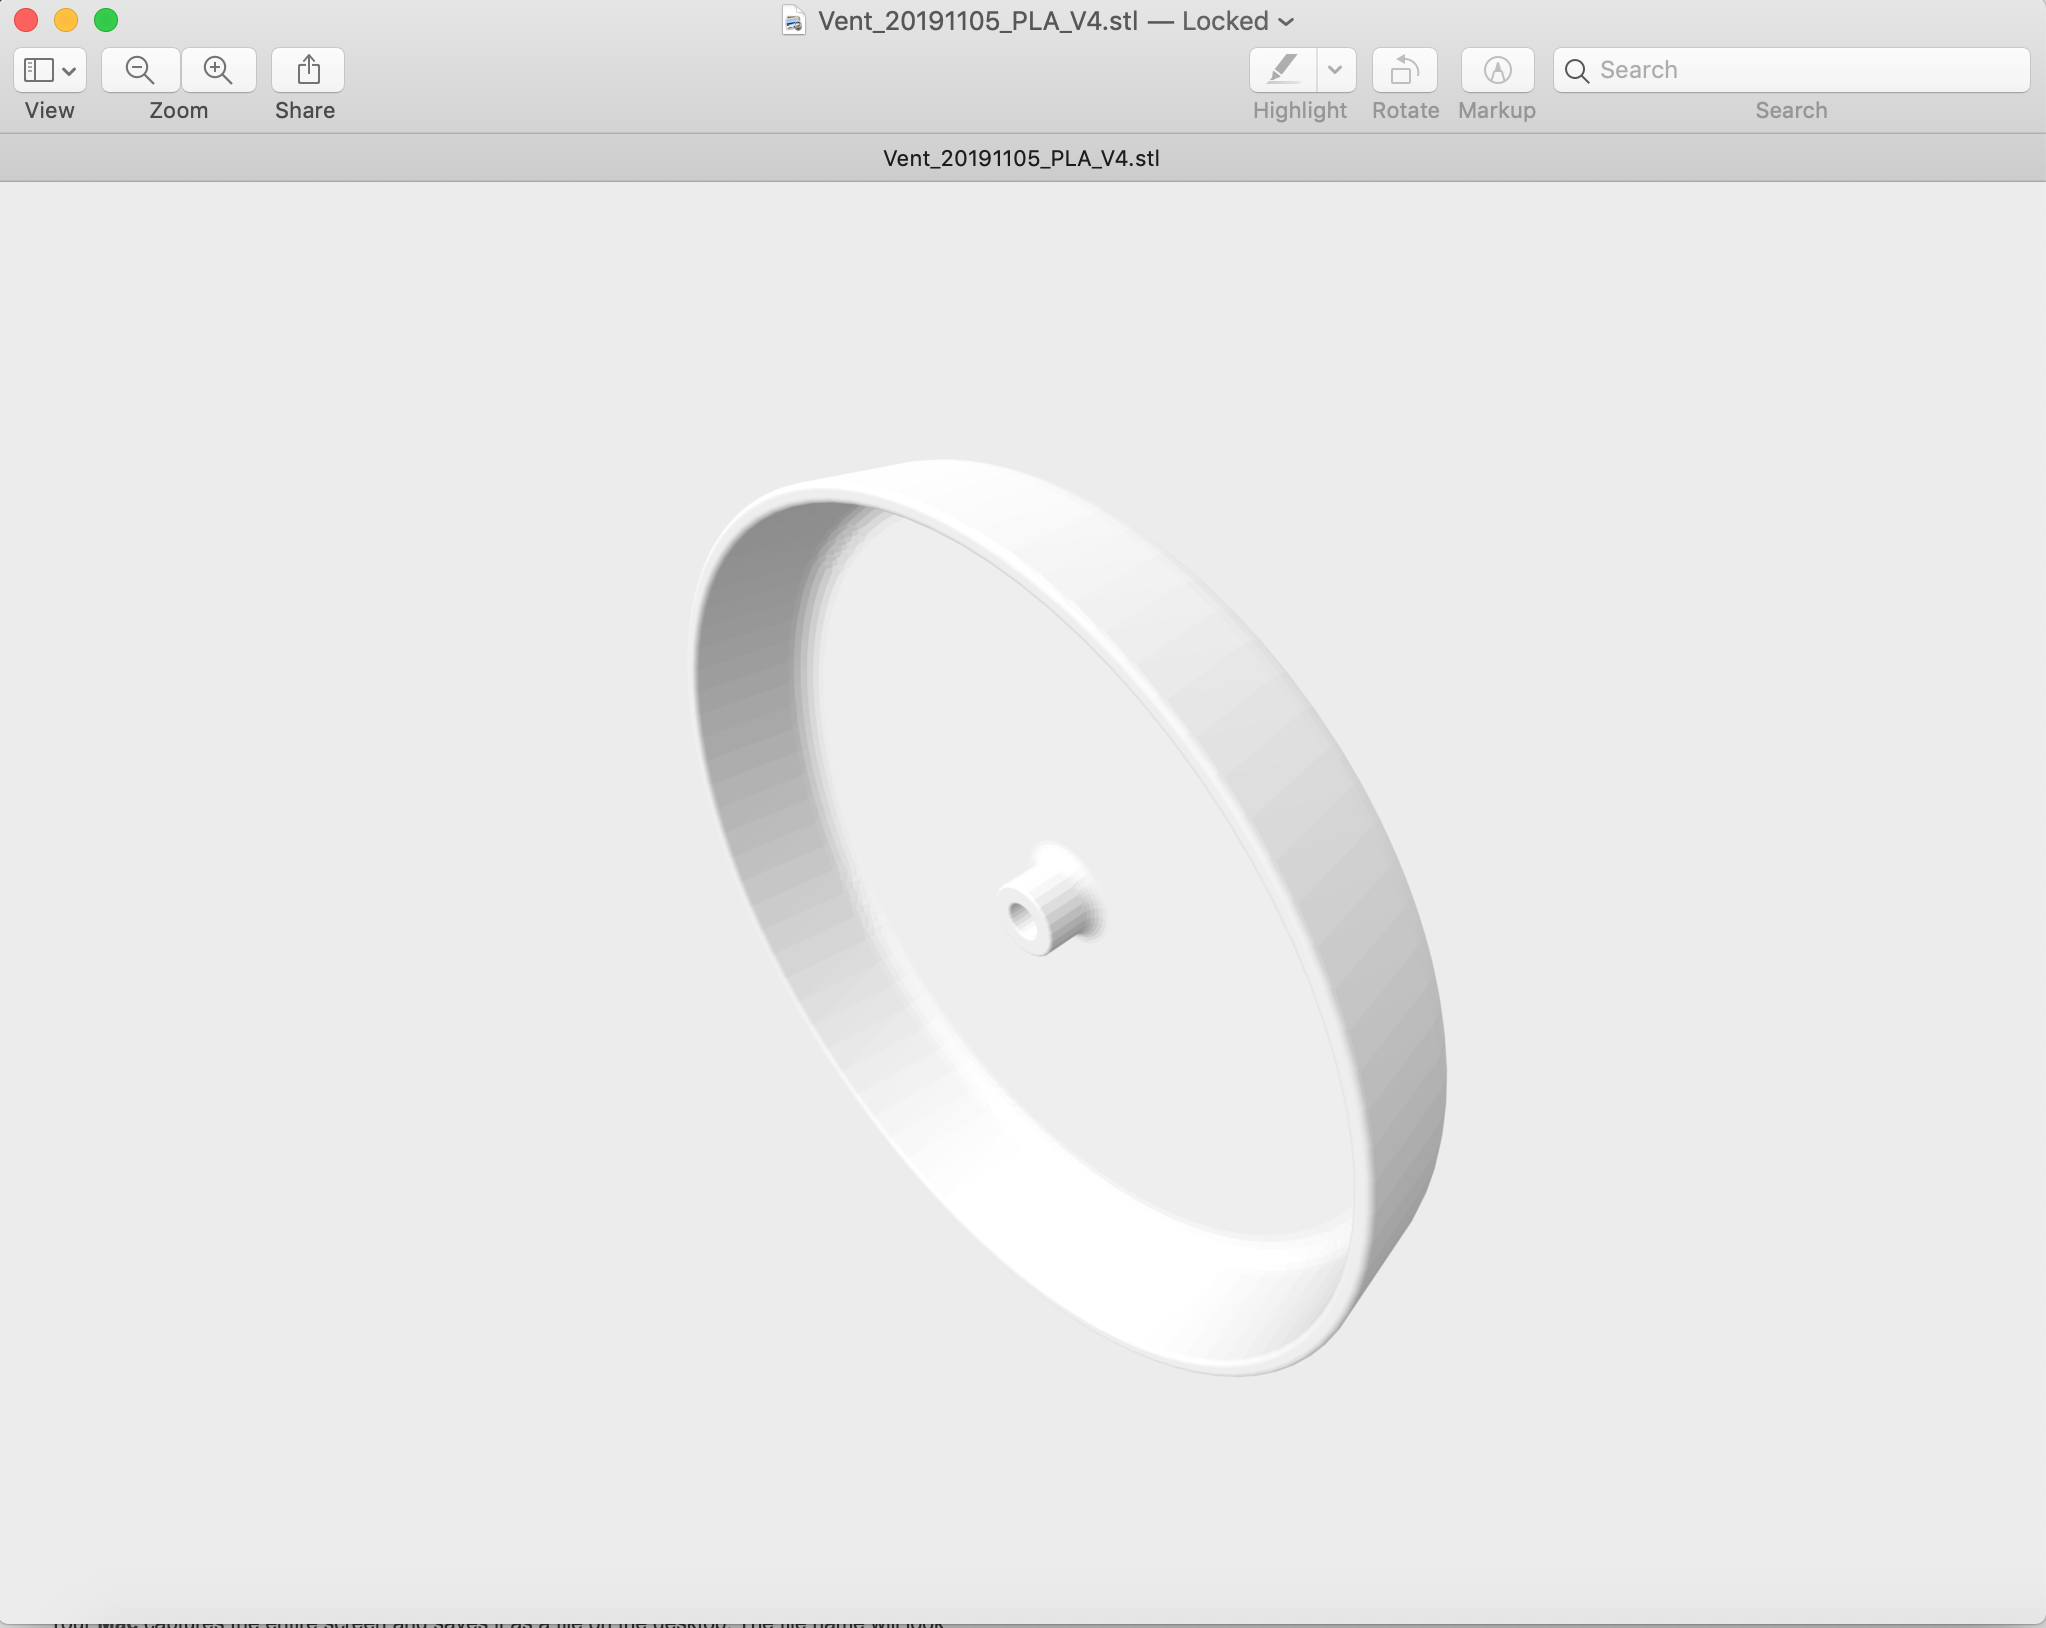
made an STL file, turned it into a gcode file, tapped the hole using a 5/16″ drill bit (I think it was) and it screwed back on. No writing to America to replace one every time I repeated my mistake. If anyone is interested I’ll try to work out where I can leave a link for the STL file so that any 3D printer could make more. I made this comment a few weeks ago on the home page of the forum and it never got published. Maybe I was deemed to be going into competition with CLC?. I’ll try linking it the way photos are linked and see if it works, else I’ll have to try something else. Interested to see if anyone wants these things to replace lost vents but I cant be bothered making them myself (unless you live in Melbourne), lots a people have 3D printers these days anyway.
February 10, 2020 at 5:13 am #2886ParticipantPopeye re: the internal lock, looks good, I’m happy with mine, maybe I could pull the shelf off if I tried on mine but I doubt it.
-
AuthorPosts
- You must be logged in to reply to this topic.