Welcome to TeardropForum.com › Forums › Teardrop Builders’ Forum › Color Scheme Opinions?
- This topic has 11 replies, 8 voices, and was last updated 8 years, 4 months ago by
srunyon12.
-
AuthorPosts
-
January 2, 2018 at 3:14 pm #1523
abrightwell
ParticipantHey Everyone,
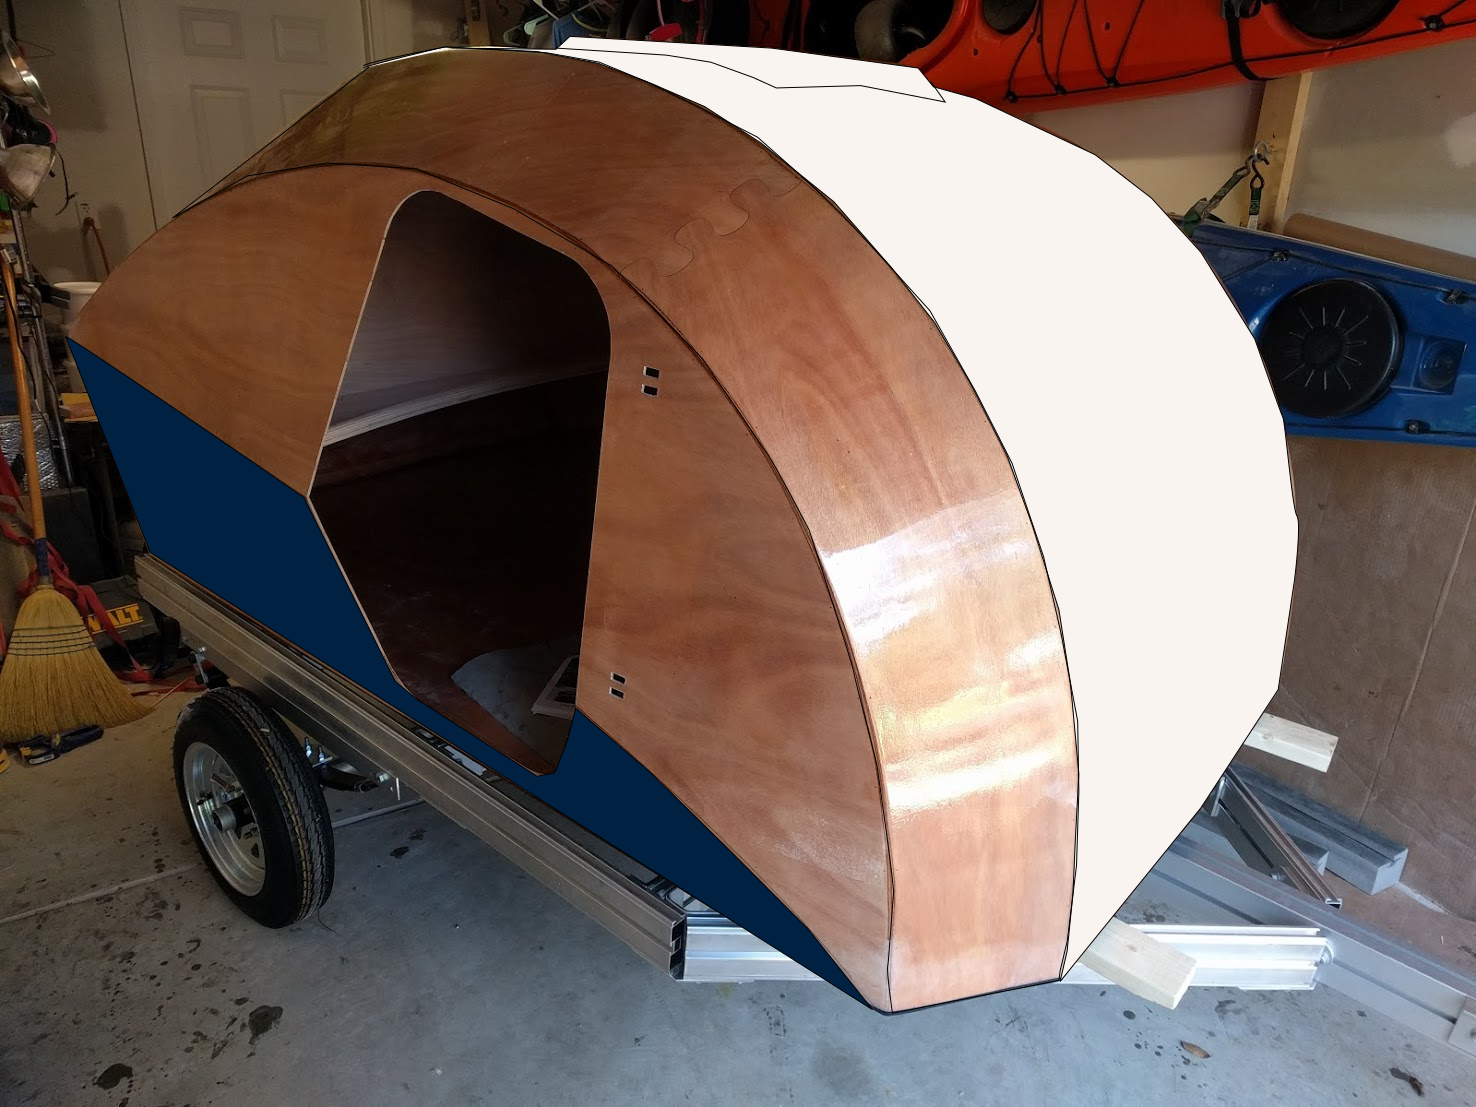
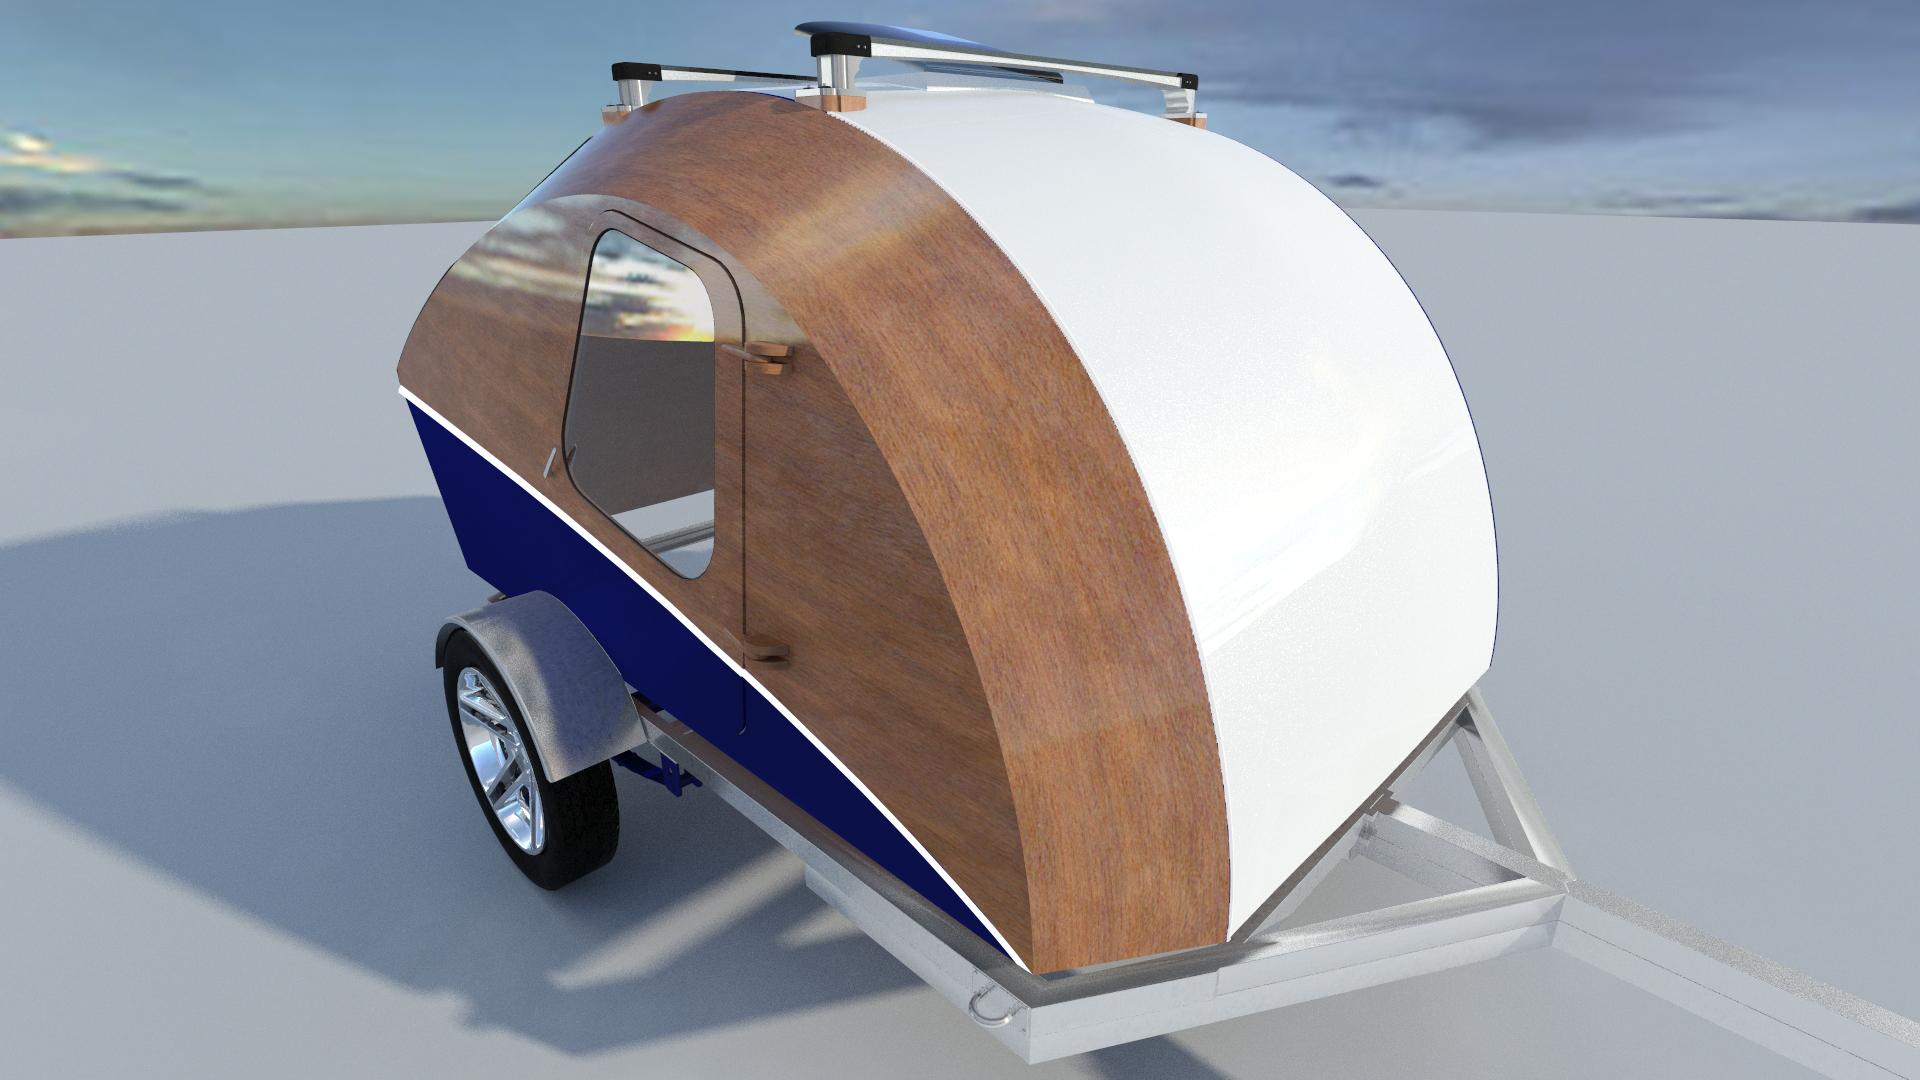
Recently, I’ve decided due to some ‘imperfections’ to paint sections of my teardrop. Primarily, the #1 panels. I’ve pretty much decided from the start that I was going to paint the #4 panels the same color as the bottom. In this case, I chose “flag blue” which turned out looking better than I expected on the bottom. I do, however, want to make sure some of it is varnished. After all, what’s the point of using such a beautiful wood if you aren’t going to at least show some of it off. Therefore, I was planning on varnishing the #2 and #3 panels.
At any rate, I was hoping to get some opinions, here is a superimposed picture of what I was thinking. Please feel free to speak your honest opinion.
 January 2, 2018 at 3:36 pm #1525
smithn00
ParticipantI plan on doing 1 & 2 white and the bottom 2″ black all around.
January 2, 2018 at 3:36 pm #1526tbellenger
ParticipantI like it! I’ve kept the wood all over so far and just completed our first 1000 mile trip. Driving through snowy areas the lower front of the camper gets pretty mucky so you will have dirt all over the white section. As long as you’re ok with that it looks good. Nothing a hose down can’t fix.
January 3, 2018 at 10:29 pm #1549apkley
ParticipantGo with your heart, but I my advice is that lighter colors will make for a cooler camper (no pun intended). The fan is good, but no sense it making it work harder than it has to.
I will add that it doesn’t matter what color scheme you choose. You’re going to generate all sorts of interest on the road.
January 4, 2018 at 11:31 am #1550Participant@apkley – That’s precisely why I had chosen white for the top. I figured it was the best color to minimize heat. As for panel #4 being a dark color, that’s definitely had me scratching my head on whether or not it will impact the overall temperature inside. I have the vent fan as well I intend on installing the mushroom vents and other cabin fans. Though, living in the Southeast and knowing that the majority of my usage will likely be on the Florida, Georgia and Carolina coasts, I’m absolutely sure that fans just won’t cut it during the warmer months. So, I intend on working one of the ClimateRight AC units into the design.
I’m still working on how I’ll integrate it, the only real requirement for it that I have is that no new holes will be made specifically for it. So my initial thought is to repurpose two of the mushroom vents during the warmer months (or even colder since it has a heater as well). I’ve got some ideas for an adapter sketched out and I intend to CAD it out sometime in the next month or so. Then I’ll start prototyping it with my CNC or a 3D printer. If I can make something work (fingers crossed), then I’ll make the design available to anyone that wants to use/modify it for their own purposes.
@tbellenger – Thanks for the input and opinion, I kind of like it too. Being candid, I’m a little bummed at the imperfections, primarily due to ‘outgassing’. When I was laying up those panels, the temperatures were wildly variable throughout the day and almost impossible to control in my garage. I read and discussed many recommendations on how to control it, but I guess I’m not that good yet. Nothing a little paint can’t fix. 😉At any rate, I’m not necessarily concerned about having to spray/wash it off after each use as I’m sure that will be standard procedure. And besides, if it’s not dirty when you’re done, then you’re not doing it right… right? 🙂
January 7, 2018 at 3:35 pm #1556Participant@abrightwell, if you had bubbling beneath the fiberglass (i.e. the fiberglass looks like it bulged out) due to temperature variation, it sounds like you are describing a bad mix ratio of resin/hardener, not outgassing (uncured epoxy expands according to my conversations with CLC). If that is the case, you might be able to salvage it and not have to paint at all.
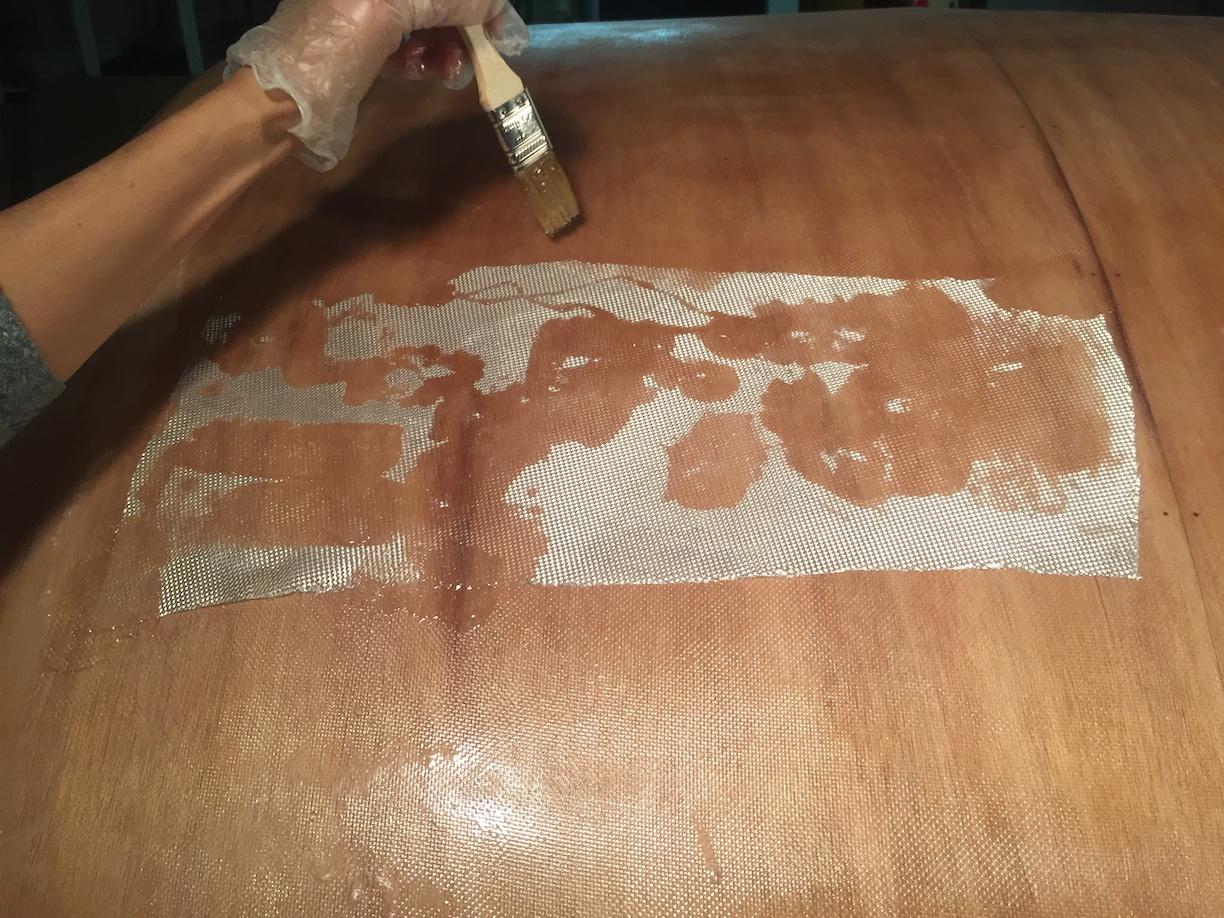
We had similar bubbles during our build along both #1 panels about two feet down from the fan bezel, where the curve really starts rounding toward the bottom. We didn’t notice them until a few weeks after we epoxied when the temperature changed dramatically. We thought we would have to paint over or cover them with a stripe.
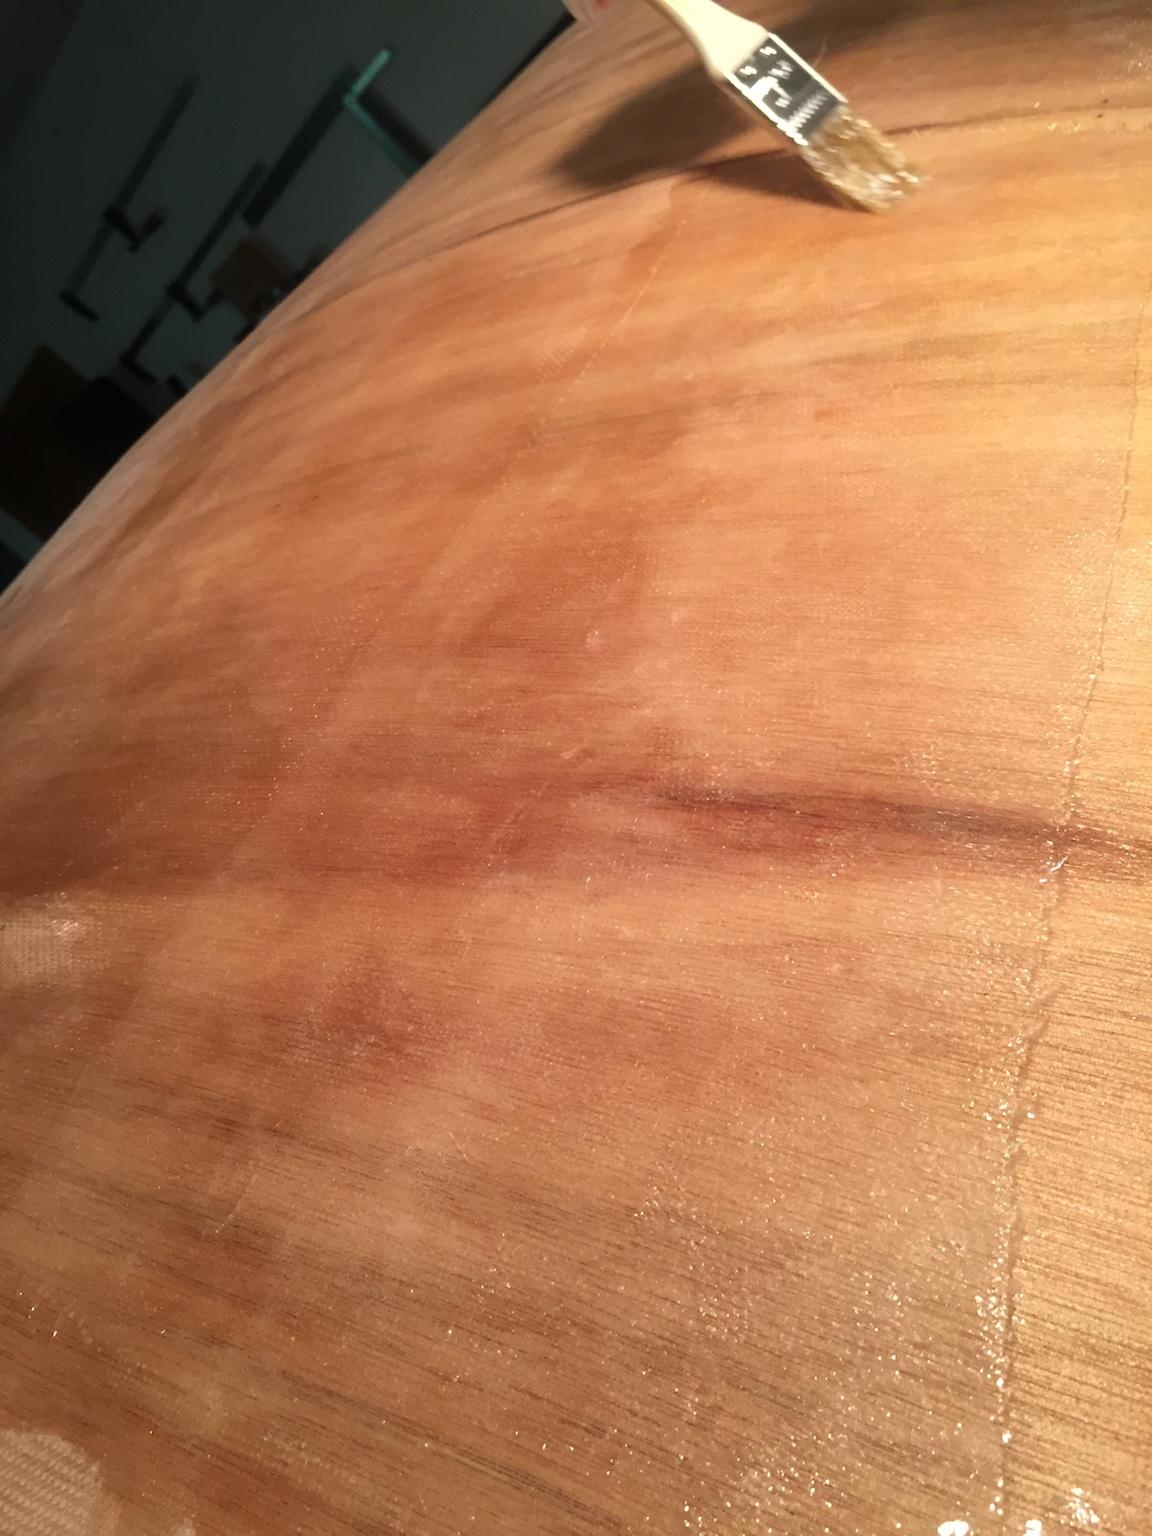
Our solution was to surgically remove the fiberglass bubbles down to the wood with a razorblade (VERY carefully to protect the wood), and then clean out the soft uncured resin with denatured alcohol. We then patched the holes with two layers of fiberglass (one the size of the hole, the next a square patch covering the hole), both soaked with epoxy. Once dried, the edges have to be smoothed out into the surrounding ‘glass. The whole process was time consuming, but the end product looks natural and we can’t tell there were ever any bubbles (but it will look patchy until the varnish blends everything). Pics below:

-
This reply was modified 8 years, 4 months ago by
apkley.
January 7, 2018 at 8:08 pm #1558CaptainSkully
ParticipantGraphite epoxy has several advantages. It’s tough, UV resistant and has a really cool dark charcoal/black color. I used West Systems 423 on my boat hull and it worked out great.
January 8, 2018 at 4:14 pm #1561ArtisticAdam
ParticipantYour right, it would be a shame to cover up all of the beautiful wood. I am partial to a two tone color scheme but your three tone isn’t bad either. I may suggest adding a pinstripe to tie the two paint colors together.
Either a Flag Blue pinstripe along the outer edge of the white:
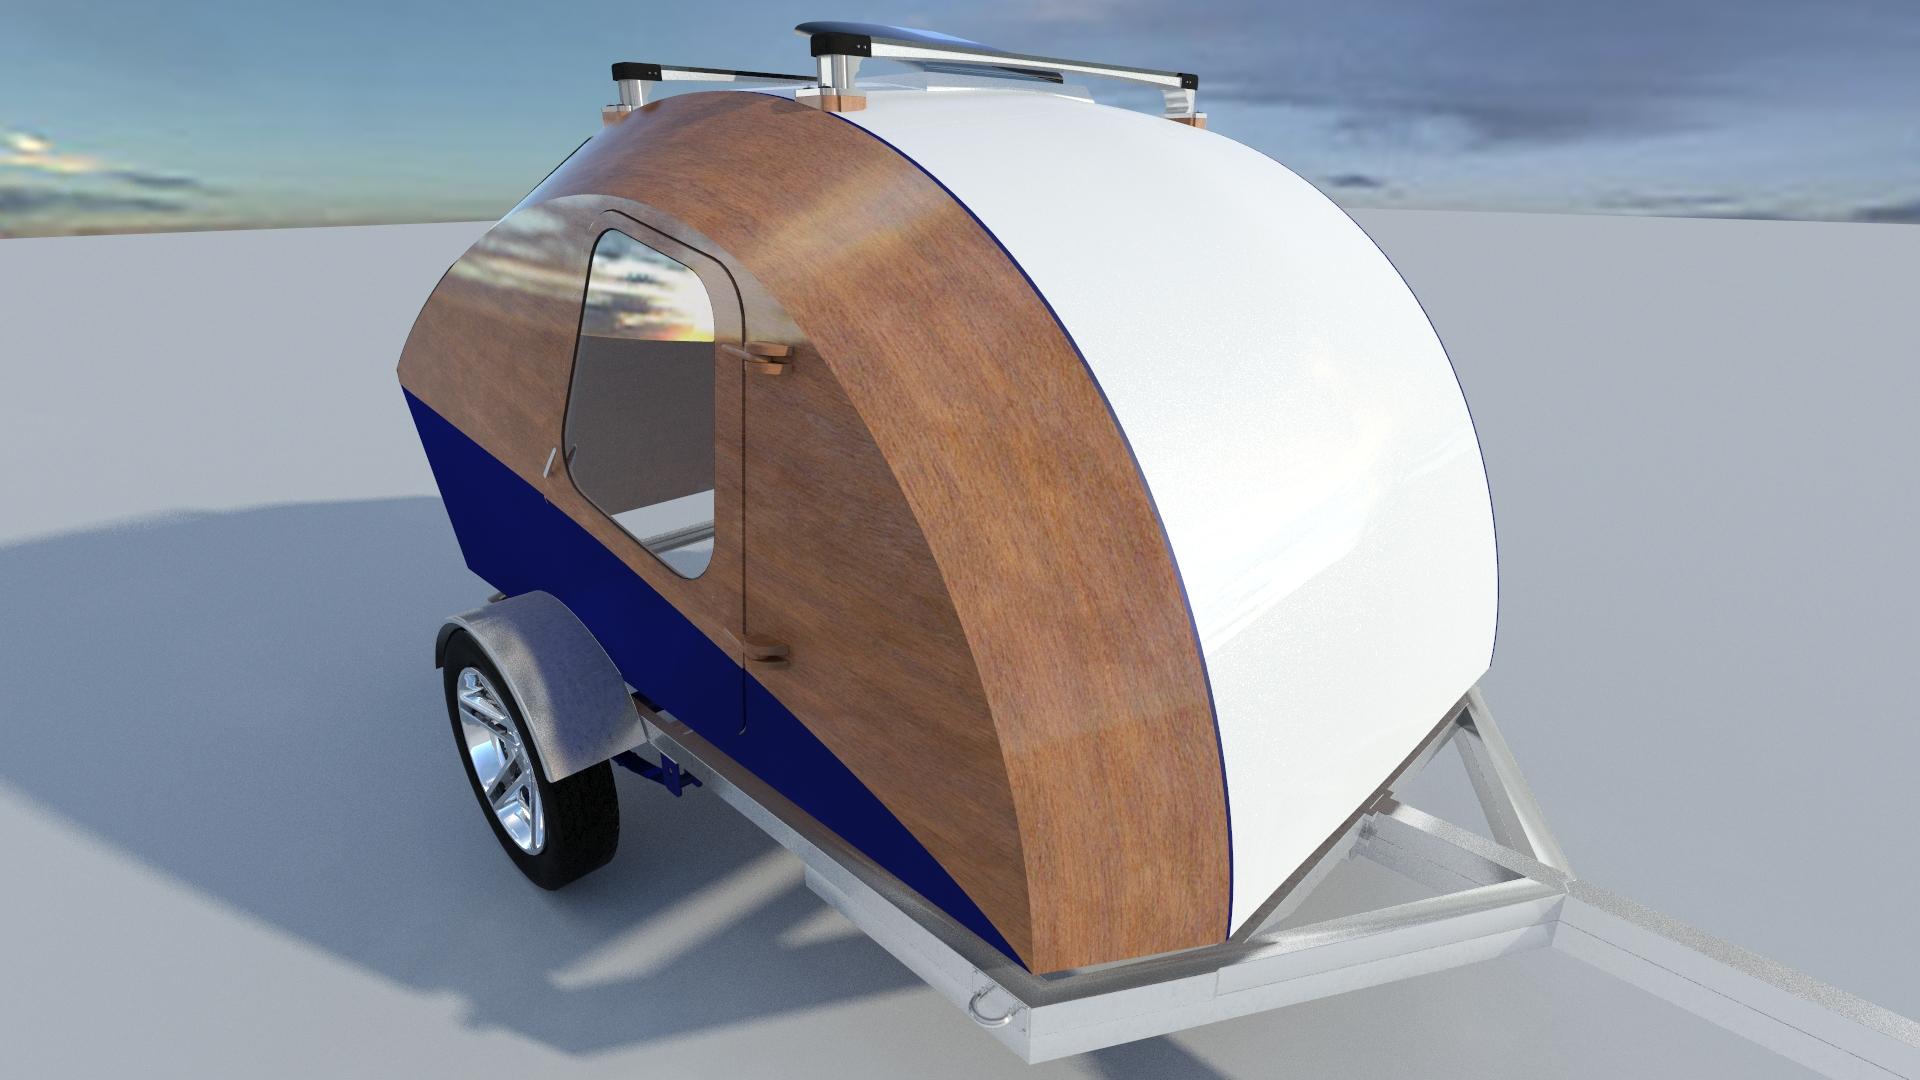
Or a pinstripe of white at the top edge of the Flag blue panel:
 January 9, 2018 at 6:56 pm #1563Participant
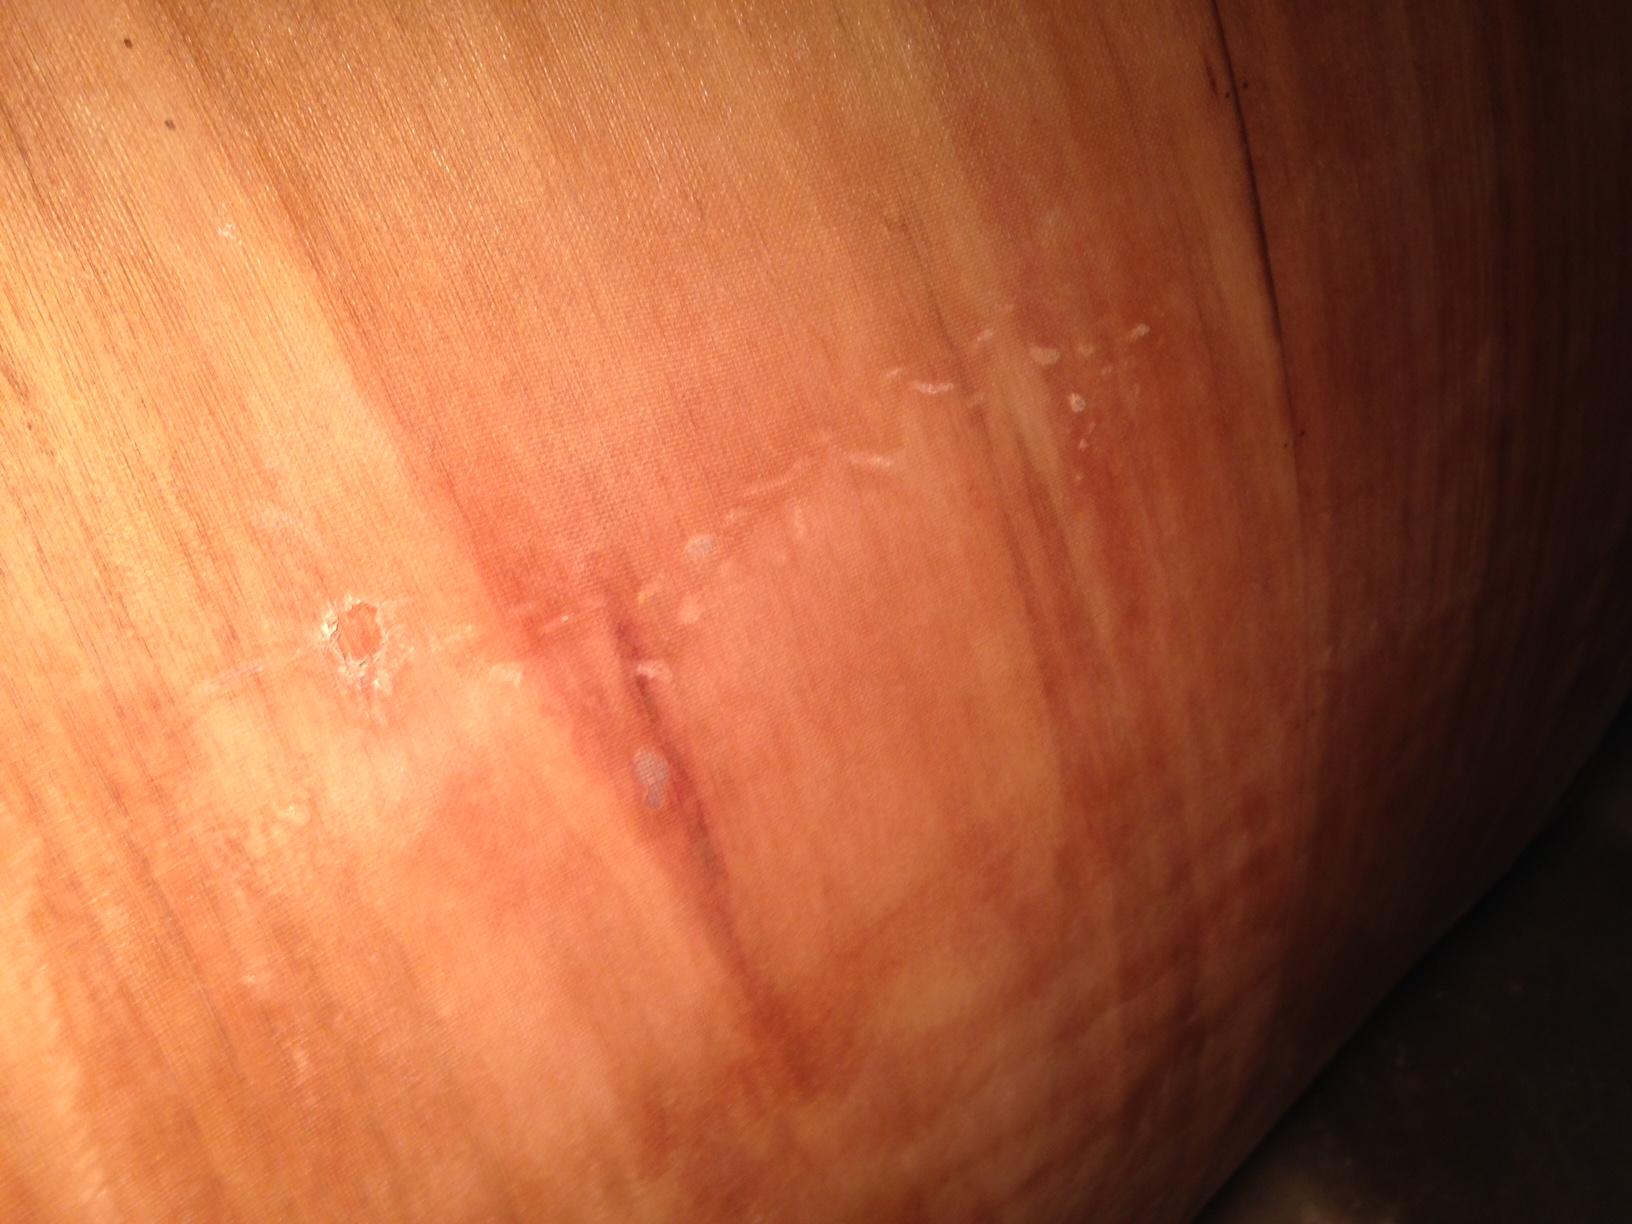
@apkley, luckily it wasn’t that. I’ve tried getting a good picture of it, but this is about the best I can do right now.
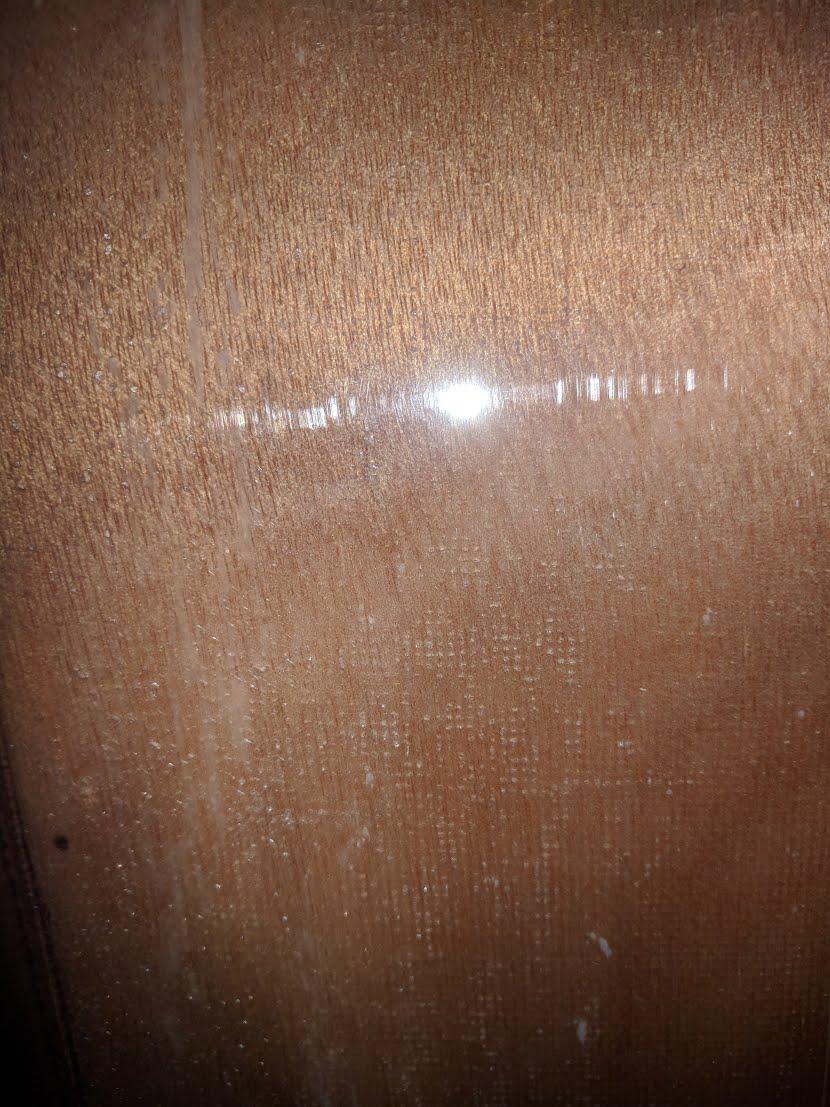
Basically, really tiny air bubbles that got trapped. In some cases they made it all the way up and left a little pin hole which was taken care of by the second and third fill coats.
Unfortunately though, it isn’t isolated to one patch. It isn’t over the entire shell, but there are enough to make grinding and patching not worth the effort at the end of the day.
If I were to do it all over again, I’d probably consider doing a pre-coat of epoxy. Though, I’ve read that it doesn’t always prevent it. In either case, it seems to be isolated to the #1 panels, so while I’m not ‘happy’ about it, I think I can live with it painted. 😉
January 9, 2018 at 7:03 pm #1564Participant@ArtisticAdam, I was thinking about doing a pin stripe but hadn’t settled on it. I think the white stripe on top of the blue might very well be a winner. Thanks for the suggestion, I really like the way that looks!
January 11, 2018 at 1:58 pm #1565friz
ParticipantI have similar blems on my camper in various spots. Nobody sees them. When I was first finished they seemed very noticeable. After almost a year, I have to look for them. Think about this. When all of your beautiful wood grain is covered, there is no going back.
January 11, 2018 at 11:58 pm #1567srunyon12
ParticipantWhat about having it wrapped?
-
This reply was modified 8 years, 4 months ago by
-
AuthorPosts
- You must be logged in to reply to this topic.