Forum Replies Created
-
AuthorPosts
-
stevie
ParticipantIt seems to be more a cosmetic problem. I really can’t say if they weaken the joint. If the bubbles aren’t dealt with though, they’ll always be visible. Not an issue if that’s the interior side. Or if you plan to paint the camper. If you’re not using the suggested epoxy spreaders, purchase some before continuing. They’ll go a long way in removing bubbles and later in removing excess fillets.
Your skill in applying epoxy and fiberglass cloth will increase exponentially as your build progresses. This feller has all sorts of how-to epoxy fiberglass onto boat hulls: https://www.youtube.com/watch?v=nTmGLqhgnoM
Same principles for our builds. Many more like videos on youtube. Others show how to create fillets and smooth fiberglass cloth. They were very helpful to me.
ParticipantI used the largest size they have.
Also, haven’t mounted these yet, and may only use one of the pair purchased: https://www.amazon.com/Mr-Auction-Brass-Clamshell-Cover/dp/B00OTZOM1A/ref=sr_1_sc_1?ie=UTF8&qid=1497234949&sr=8-1-spell&keywords=clamsehll+vent+brass
They’re not brass, but instead are cast iron. Probably salvaged from a ship. I’ll paint a complimenting (or contrasting) color and most likely mount on transom.
Even with the largest clamshell iboats.com has, the openings can’t keep up with the exhaust fan. I suspect the mushrooms vents don’t either, unless two pairs are installed.
Perhaps I should stress is that these clamshell vents must be mounted on flat surfaces. They will not adapt to curvatures.
ParticipantI used 3/8″ too. Also did the butt block roundover prior to gluing to TD bottom.
Whenever my build was at a standstill – waiting for epoxy to cure, bad weather, etc, I scanned ahead in the manual. If something could be assembled, sanded, glued, or varnished beforehand, it often saved a beau coup of time at a later date.
Not really related… I had more Cell-O-Fill than wood flour and subsequently ran out of the latter. I successfully used wheat-flour as a substitute. It was a bit darker than the supplied wood flour, but you could use a bit of Cell-O-Fill to lighten the epoxy mix.
I experimented with ashes from my woodstove too, and it turned the epoxy mix almost black. The only location I used it was the filling gap above the eyebrow (p. 250-251). It provided a subtle “racing stripe”. I recall that CLC used pinstriping on this location. In retrospect, I wish I’d added copper powder instead of ashes for effect. I suppose one could use many colored powders instead, though test for compatibility beforehand.
ParticipantI used a router on my TD’s bottom. It went quickly and without incident. Did same for butt block as well. No doubt other builders have done the same with similar results.
If you’re contemplating omitting the roundovers, I wouldn’t. Fiberglass cloth will give disappointing results when attempting to negotiate right angles. Plus, rounded edges are more aesthetically pleasing.
ParticipantI’d offer that installing the galley unit reinforces the galley floor. This may be a problem for those who don’t opt for it. I haven’t had any problems, though I would’ve reinforced that area with a piece of fiberglass had I known.
Five gallons of water is a bit over 40 lbs. Seems like the galley floor could easily handle that w/o additional reinforcement. Perhaps you had the bad luck of receiving an inferior piece of plywood.
ParticipantHere I am, probably too late again.
Before cutting my doors, I pre-prepared the stiffeners as much as I could.
Then, I cut out one door and within minutes had the stiffener clamped and glued with the thickened epoxy. Once satisfied, I cut out the 2nd door and did same.
To date, both doors have been true to the original angle. I did store them indoors, vertically on their sides until needed.
It sure beat trying to glue stiffeners before doors were cut.
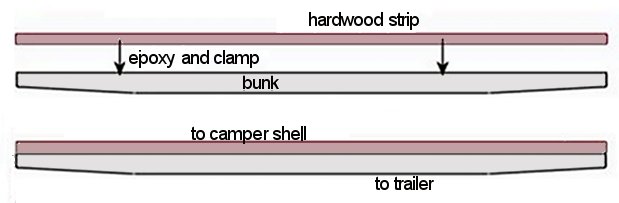
ParticipantHere’s an illustration…
 Participant
Really this is very simple.
You need a length of hardwood as long as the bunk. Rip it to the bunk’s width. Epoxy to bunk. If you need more height, make another piece of hardwood and epoxy to bunk. I used the supplied epoxy thickened with Cell-o-fill.
ParticipantMine is mounted on a Harbor Freight trailer.
I cut a section of oak lumber, ~1.5″ high and the length and width of the bunks. I epoxied it to the bunks to provide clearance above the fenders. It worked out just fine. There’s a bit of space above the fenders and it doesn’t interfere with entering or exiting the camper.
I followed the manual and installed the camper’s rear end 32″ from the axle. It is rather light on the tongue, but an added footlocker loaded with gear and spare tire have made the tongue notably heavier. I also bolted a pair of stabilizer jacks onto the the trailer’s rear end to keep the camper from going tango uniform.
ParticipantThis may be only mildly applicable to this situation. Instead of mushroom vents, I installed clam shell vents. Ordinarily these are used on boats. I purchased mine from here: http://www.iboats.com/Seadog-Clam-Shell-Vent/dm/view_id.886137
They’re stainless steel, so no UV deterioration of plastic. And no moving parts to wear out. I did add window screening underneath to keep out insects. And I fashioned plugs from packing foam to seal out drafts. An application of RTV silicone around the inside edges made an excellent gasket.
Best of all, they have not leaked at highway speed and rain.
-
This reply was modified 8 years, 8 months ago by
stevie.
ParticipantHere’s another possibility….
My bottom door fairlead could not be aligned so as to bolt the doors properly. I finally arrived at a solution, if not elegant, it is functional. In essence, I brought the fairlead closer so the rod could engage it. Both doors seal nicely.

-
This reply was modified 8 years, 8 months ago by
ParticipantIs it because the cut rod length is too short? If so, go to this topic: Door Actuation Rods on the forum.
ParticipantOddly enough, my blooming took place at the very same location. I’m in the Memphis area and we had a wonderfully mild winter, so perhaps the bloom wasn’t temperature related.
Whatever the reason, a vinegar wash was far less difficult than getting out the orbital sander, etc.
ParticipantI used the Harbor Freight Folding Trailer #90154. It’s 4×8 ft, however, I shortened it about 20 inches or so.
It was my desire to not be banging my shins into the trailer’s end crossbar, tail lights, or license plate.
I did re-color the trailer with John Deere Green paint. It’s durable, easy to apply, and you can always find a retailer that carries it. The original red paint does require a bit preparation before it is painted with another color.
-
This reply was modified 8 years, 8 months ago by
-
AuthorPosts