Forum Replies Created
-
AuthorPosts
-
madebymike60
ParticipantSo I’ve basically traded aluminum tubing for the plastic risers that come with the trailer. But using the kit supplies, it seems you could follow a similar procedure to attach the camper without needing to flip it. Again, a creeper helps for the work under the trailer.
If it’s not already in place, start by setting the camper on the trailer (following the directions to align it) but have the risers in place, maybe using small pieces of double sided tape. Their holes should be lined up with the holes in the trailer mounting brackets. Next, from underneath, you’ll drill a 3/8 inch hole through the camper bottom using the bracket/riser holes as a guide.
The next step might be a little tricky but can be done with a short pry bar or the air shim shown above. (If you use a pry bar, a scrap piece of wood placed against the camper bottom can prevent damage.) At each bracket, raise the camper slightly to be able to slide the plastic risers a little out of the way (for drilling the 1/2 inch hole from above and taping) but still supporting the camper. You’ll drill the 1/2 holes from inside the camper, tape over them from underneath the camper and then fill them from inside with thickened epoxy. A ‘regular’ 1/2 inch twist drill bit (not Forstner, not spade) will use the smaller hole as a ‘guide’ and should work best for enlarging the holes. Wait a day and carefully drill 3/8 holes through the epoxy. If you hit bare wood, coat it with unthickened epoxy. Raise the camper slightly at each bracket again, slide the risers back in place one at a time, add the rubber washers and line up all the holes. Drop or tap a bolt through from the top and tighten.
This is more steps and you do have to work under the trailer more but the trade off of not flipping the camper twice seems worth it. Reply to this if you try it and/or have any suggestions.
ParticipantHere’s another follow up. There was one more epoxy joint that had failed (also at the front of the trailer) so even though eight others were still holding, it was likely just a matter of time before they failed. I’ve attached mine the ‘proper’ way now switching out eight of the short bolts for ones that go through the camper. I left the two center ones alone to see if the epoxy will hold over time.
For anyone who hasn’t attached your camper and reads to the end of this topic, I don’t think you need to flip the camper to do it. I didn’t when I ‘fixed’ mine and it seems like an unnecessary step. Here are my steps:
1) While under the camper/trailer, drill a 3/8 hole the rest of the way through the aluminum tubing and the camper bottom.
2) From inside the camper, drill a 1/2 inch hole at each location, just through the wood.
3) Tape over the holes on the bottom of the camper, instead of inside the camper, like the directions show.
4) Fill the holes from inside the camper with thickened epoxy, instead of from the outside.
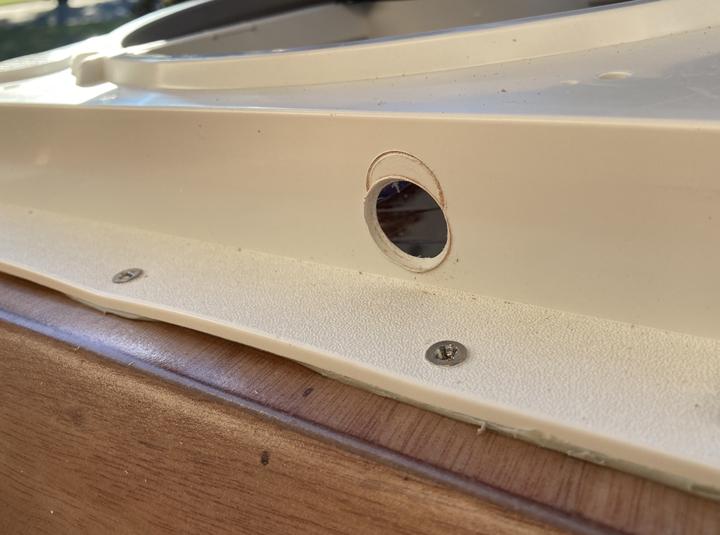
5) After a day, from inside the camper, I re-drilled the 3/8 inch holes. This is where it helps to take your time so that your holes look like the one below and have an epoxy circle protecting the wood. (The black is the U-pol coating.) Two of mine at the back of the camper (the ones harder to get at) needed the coating of unthickened epoxy but the others were good.
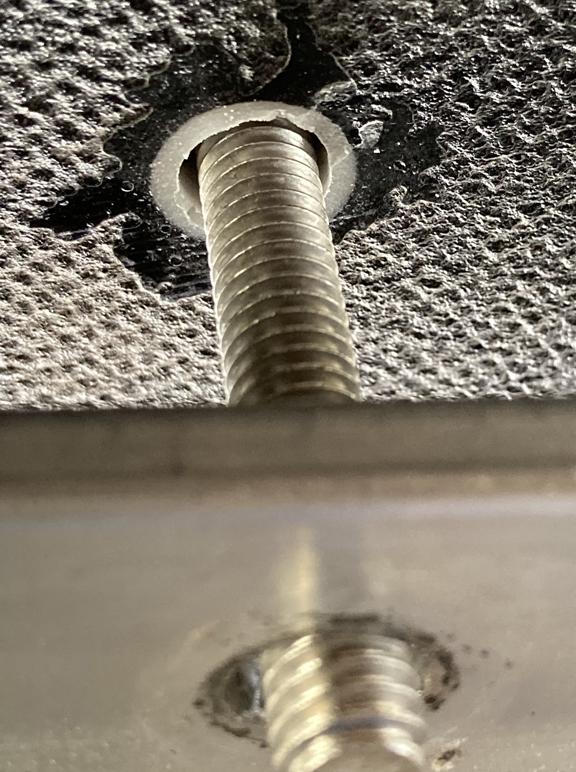
6) The picture above shows one where I put the aluminum and rubber washer back in place but after doing that, I fit a bolt through from inside the camper and tightened everything. For most, the tubing and washer were already in place.
ParticipantYes, it was easy to tell. The separation was between the epoxy and the U-pol raptor coating which I put on the bottom of the camper. (By the way, that coating seems extremely tough and like it will never come off.) I vaguely remember not sanding one of the areas on the bottom of the camper but don’t know if it’s the one that failed. The epoxy was still stuck to the aluminum which I had sanded with 80 grit paper before installing. I could scrape the epoxy off the aluminum but it took effort and only came off in tiny pieces.
Now I’m thinking about redoing only some of the brackets the ‘proper’ way, enough so the camper stays put, and seeing if the few I leave with my method happen to hold. I’m curious to know just how good (or bad) an idea it actually was.
ParticipantWell, it seemed like a good idea and was worth a try but after a couple of short trips around town, one of the epoxy joints at the front of the trailer separated and that’s one too many. I think the bracket locations were all cleaned and prepped the same but maybe there was something different about that one. It doesn’t matter though, other joints may never separate or may not be too far behind but it’s not worth the risk. I can change to the method of drilling through the camper without having to flip it so I’m glad to find out now when it’s easy enough to redo.
So once again, do not try this method of attaching your camper or if you do, do so at the risk of seeing your camper in the distance in your rear view mirror.
jb and breescyclust, I do appreciate the feedback. I thought about some of the same things before trying the idea and it’s good to see others on this forum thoughtfully critiquing what’s being posted. (It seems like there should be a moderator doing that occasionally though.)
January 11, 2022 at 9:37 am in reply to: Glassing inside doors and hatch, is there enough fiberglass? #4109ParticipantI can’t answer one of your original questions because I bought extra fiberglass but maybe this will help. Reading on the forum about other places to glass, I got 3 yards from Amazon early on so I wouldn’t run out, thinking I was going to also make my own galley module and glass it (which I never did).
I did glass the inside of the doors and part of the galley hatch and the galley flat. The galley flat was with ‘scrap’ pieces though. I also added a substantial stiffener to the galley hatch and installed the door stiffeners before cutting out the doors. (Some of this is in other posts.) Overall, I like how both the hatch and doors kept their shape and fit well after being cut out. It’s hard to tell if the glassing and/or stiffener made the difference but I wouldn’t do it differently.
The only issue with their fit seems to be the thickness of the foam, especially at the doors. They are held out a bit by the supplied foam and if it ever wears out, I’ll probably try a slightly thinner one.
Anyway, I have 4-5 feet of the supplied fiberglass left over and might not have run out (barely) but having the extra meant I didn’t have to worry about it, and I have a little for future repairs or projects (not that I want to work with epoxy any time soon).
ParticipantGood idea. I knew I had seen it before, did a search for ‘table’ and came across your post from about a year ago. Thanks for the reminder. Also, I’ve got three ‘spaces’ so the middle one might be the table and there could be a shallow drawer on each of the two sides. This is the fun part, thinking through the possibilities and since it’s something that could be changed easily later, it’s not a problem to try an idea that doesn’t work quite like I thought it would.
ParticipantI couldn’t tell you yet but I’m still counting on it to work. I’m currently installing electrical and the insulation pieces. I’ll probably be deciding on a mattress in the next couple of weeks and then I’ll know how much room there is above it to work with. I’m planning to follow up when there’s more to share.
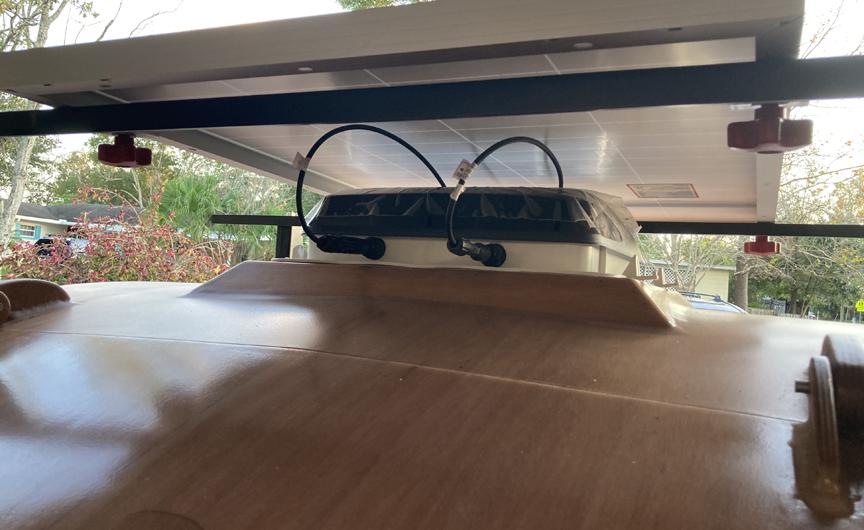
ParticipantHere’s a view of the solar panel connection. As the guy points out in his video, the holes for the cables are protected from rain by the fan cover and the solar panel (when it’s installed). I like that there are no holes going through the wood of the camper itself and you’re basically using a hole that was already there. I didn’t show it but I did have to modify (cut) some of the inside plastic of the fan to allow the cables bending room.
 Participant
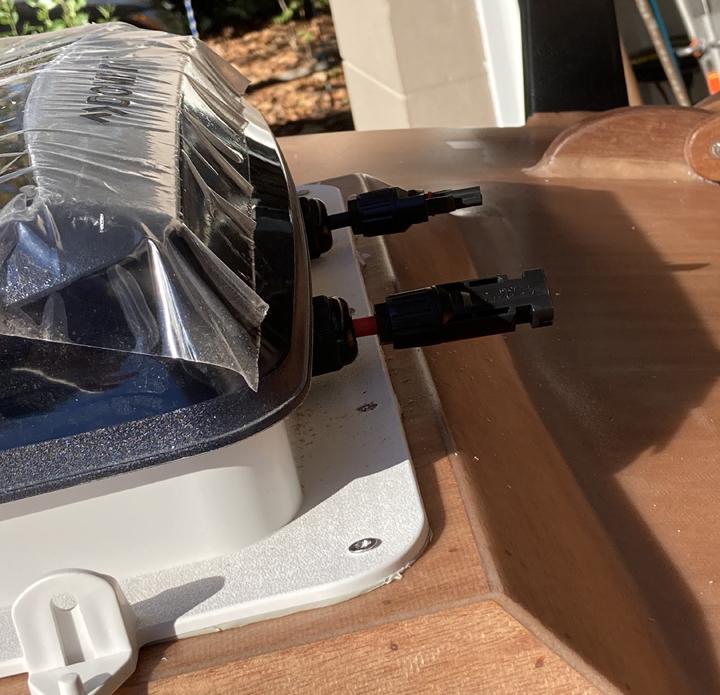
Here are the cables as they exit the fan housing outside. You need to pay attention to what type of connector is on each so they match up with your panel connectors. These cables are about three feet long and the other ends will be in the galley. Connected to my solar charge controller are longer cables (about 10 feet) that can connect to those ends when the solar panel is on top of the camper. If I ever want to place the panel in a better spot, I disconnect it from these shorter ones and connect directly to the longer ones going to the charge controller.
 Participant
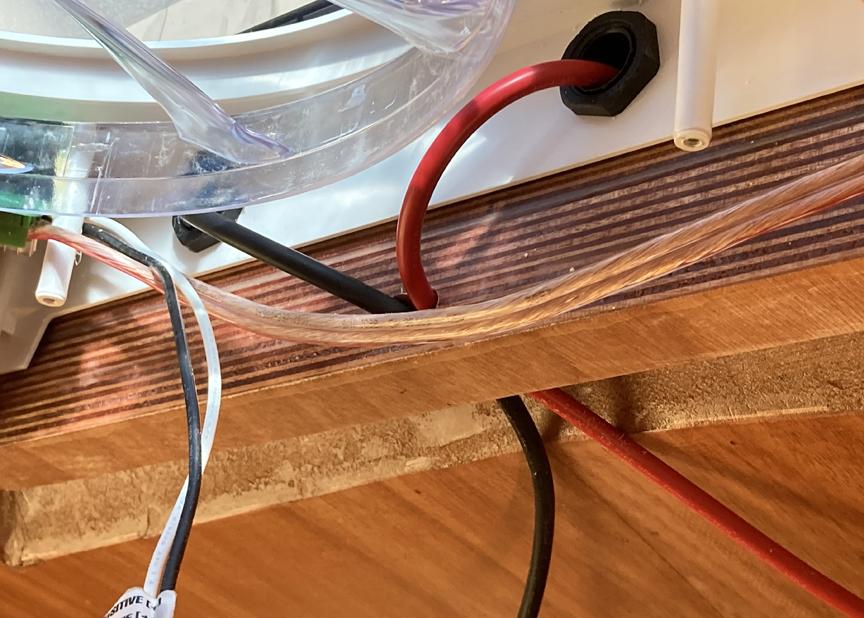
Back inside, with the cables passing through the glands, you’ll need to remove the cover to the fan and drill a large enough hole for the cables to exit the fan area. My electrical will be in the galley so my cables will go straight back and through a hole in the bulkhead with other wires.
 Participant
Start by drilling holes in the back of your fan housing. The size will depend on the size of the cable glands. Mine was a 5/8 inch hole, which then had to be widened just slightly with some sanding. I almost goofed and made the hole too high before lowering the cover to the fan and seeing that it would hit the cable gland.
 Participant
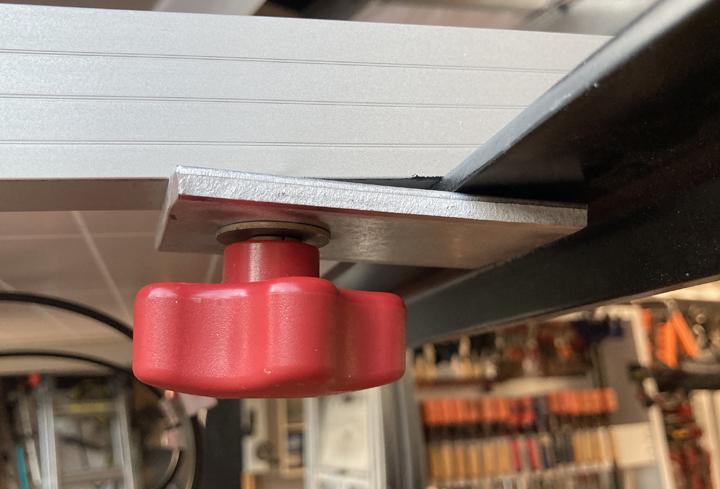
Here’s how the solar panel will likely clamp to the rack. It’s just a thick piece of aluminum (2″ by about 2.5″) with a hole drilled toward one end. I had the aluminum and hardware (knobs, bolts and washers) already so it was pretty much no cost and holds very tightly. Two of the pre-drilled holes in the solar panel frame worked but I had to drill two more to match the distance between the rack cross pieces.
 Participant
Finally, one benefit of the door that I wouldn’t have thought of earlier is being able to see into the galley with the hatch closed. It helped when installing locks for the hatch (one is in the picture below) and recently I was able to measure accurately to know if a cooler will fit before buying it. It should also help to see where water might be coming in, though I’m counting on no leaks at all. By the way, also in the picture is my version of a hatch stiffener, made from the kit cabin shelf.
 Participant
Here’s pretty much the same thing but gives an idea of the opening size. It’s big enough to pass a snack, drink or plate of food through or reach something in the galley without getting out of the camper.
 Participant
So here it is a bit further along. Overall, I like how this side of the bulkhead turned out. I think it looks good and I believe the door to the galley will come in handy later. Two issues with the (extra) shelf above the door. It turned out pretty small and not very practical for storing anything really but I think it will make a nice place to put small souvenirs from places I travel to, firmly attached of course. Also, as you might expect, it ended up exactly where two screws for the galley hatch lift were to go. I installed them about 5/8 inches higher than the directions called for and that worked fine.

-
AuthorPosts